
The Phaser Game Framework in 5 Minutes

Phaser is the most popular JavaScript/TypeScript framework for making 2D games. It’s performant, and popular games like Vampire Survivors and PokéRogue were made with it.
Because it’s a web-native framework, games made with Phaser are lightweight and generally load and run better on the web than the web exports produced by major game engines.
For that reason, if you’re looking to make 2D web games, Phaser is a great addition to your toolbelt.
In this post, I’ll explain the framework’s core concepts in around 5 minutes.
— SPONSORED SEGMENT —
In case you want to bring your web game to desktop platforms, today’s sponsor GemShell, allows you to build executables for Windows/Mac/Linux in what amounts to a click. It also makes Steam integration easy.
For more info, visit 👉 https://l0om.itch.io/gemshell
You have a tool/product you want featured in a sponsored segment? Contact me at jslegend@protonmail.com
The Phaser Config
A Phaser project starts with defining a config to describe how the game’s canvas should be initialized.
import Phaser from "phaser";

const config = {
  width: 1920,
  height: 1080,
  backgroundColor: "#000000",
  parent: "game", // id of the parent element of our canvas
};

new Phaser.Game(config);
<!DOCTYPE html>
<html lang="en">
<head>
<title>my-phaser-game</title>
</head>
<body>
<!-- canvas will be created within div with id "game" -->
<div id="game"></div>
<script type="module" src="/src/main.js"></script>
</body>
</html>To make the game scale according to the window’s size, we can set the scale property in our config.
import Phaser from "phaser";

const config = {
  width: 1920,
  height: 1080,
  backgroundColor: "#000000",
  scale: {
    mode: Phaser.Scale.FIT,
    autoCenter: Phaser.Scale.CENTER_BOTH,
  },
  parent: "game",
};

new Phaser.Game(config);
The mode property is set to FIT, so the canvas scales while preserving its own aspect ratio. As for keeping the canvas centered on the page, the autoCenter property is used with the CENTER_BOTH value.


Scene Creation
Most games are composed of multiple scenes and switching between them is expected during the course of gameplay.
Since Phaser uses the object oriented paradigm, a scene is created by defining a class that inherits from the Phaser.Scene class.
export default class Game extends Phaser.Scene {
  constructor() {
    super({ key: "game" });
  }

  create() {

  }

  update() {

  }
}
To be able to reference the scene elsewhere in our code, it’s important to give it a key. For this purpose and for being able to use the methods and properties of the parent class we need to call the super constructor and pass to it the key we want to use.
The two most important methods of a Phaser scene are the create and update methods.
The first is used for, among other things, creating game objects like text and sprites and setting things like scores. It runs once, every time the scene becomes active.
The latter which runs once per frame is, for example, used to handle movement logic.
Hooking Up a Scene to Our Game
Once a scene is created, we still need to add it to our game. This is done in the Phaser config under a property called scenes, which expects an array.
import Phaser from "phaser";
import Game from "./scenes/Game";
import GameOver from "./scenes/GameOver";

const config = {
  width: 1920,
  height: 1080,
  backgroundColor: "#000000",
  scale: {
    mode: Phaser.Scale.FIT,
    autoCenter: Phaser.Scale.CENTER_BOTH,
  },
  parent: "game",
  scene: [Game, GameOver],
};

new Phaser.Game(config);
The order of scenes in this array is important. The first element will be used as the default scene of the game.
Switching Scenes
To switch scenes, we can call the start method of the scene manager.
export default class Game extends Phaser.Scene {
  constructor() {
    super({ key: "game" });
  }

  create() {
     /* Switch over to the game over scene
      as soon as the game scene becomes active. */
     this.scene.start("gameover");
  }

  update() {

  }
}
Rendering Sprites
Before we can render sprites, we need to load them. For this purpose, a Phaser scene has access to the preload method where asset loading logic should be placed. To load an image, we can use the image method of the loader plugin.
export default class Game extends Phaser.Scene {
  constructor() {
    super({ key: "game" });
  }

  preload() {
      // first param is the key, second param is the path.
      this.load.image("player", "./player.png");
  }

  create() {
      this.player = this.add.sprite(500, 500, "player");
      this.player.speed = 0.02;
  }

  update(_, deltaTime) {
      this.player.x -= this.player.speed * deltaTime;
  }
}
Then, in the create method, we can render a sprite by calling the sprite method of the Game Object Factory plugin.
this.player = this.add.sprite(500, 500, "player");The first two params are for specifying the X and Y coordinates while the third param is for providing the key of the sprite to render.
create() {
    this.player = this.add.sprite(500, 500, "player");
    this.player.speed = 0.02; // created a speed property
}

update(_, deltaTime) {
    this.player.x -= this.player.speed * deltaTime;
}
Because we created our sprite game object in the create method, we don’t have access to it in our update method, that’s why you’ll often see the pattern of assigning a game object to an instance field so it becomes accessible to other methods of the scene.
Finally, movement logic code is placed in the update method which runs every frame.
update(_, deltaTime) {
    // deltaTime is used to make movement logic frame rate independent.
    this.player.x -= this.player.speed * deltaTime;
}
Rendering Text
Rendering text is similar to sprites. Rather than the using the sprite method, we use the text method.
export default class Game extends Phaser.Scene {
  constructor() {
    super({ key: "game" });
  }

  create() {
    this.add.text(100, 100, "Hello World");
    this.add.text(100, 100, "Fancier Hello World", {
      fontFamily: "Arial",
      fontSize: 32,
      resolution: 4, // Makes the text sharper. Text is a bit blurry by default.
    });
  }
}
Entity Creation
If you want to hold data or define custom methods for a sprite game object, a better approach is to define a class that inherits from the Phaser.GameObject.Sprite class.
export default class Player extends Phaser.GameObjects.Sprite {
    constructor(scene, posX, posY, speed) {
        super(scene, posX, posY);
        this.speed = speed;
        // add the game object to the scene
        scene.add.existing(this);
    }

    // custom method.
    jump() {
        // ...
    }
}
Once the class is defined, we can use it in our scene’s code.
export default class Game extends Phaser.Scene {
  constructor() {
    super({ key: "game" });
  }

  create() {
    // ...
    this.player = new Player(this, 500, 500, 0.02);
    this.input.keyboard.on('keydown-SPACE', () => {
        this.player.jump();
    });
  }
}
Asset Loading
While asset loading can be done in any Phaser scene, a better approach is to create a scene dedicated to loading assets, which then switches to the main game scene once loading is complete. This can be achieved like shown below :
export default class Loader extends Phaser.Scene {
  constructor() {
    super({ key: "loader" });
  }
  preload() {
    this.load.spritesheet("ring", "./graphics/ring.png", {
      frameWidth: 16,
      frameHeight: 16,
    });
    this.load.image("platforms", "./graphics/platforms.png");
    this.load.audio("jump", "./sounds/Jump.wav");
  }

  // runs once loading logic is complete.
  create() {
      this.scene.start("game");
  }
}
Animation API
Another important aspect of any game is the ability to play animations. Usually for 2D games, we have spritesheets containing all the needed frames to animate a character in a single image.
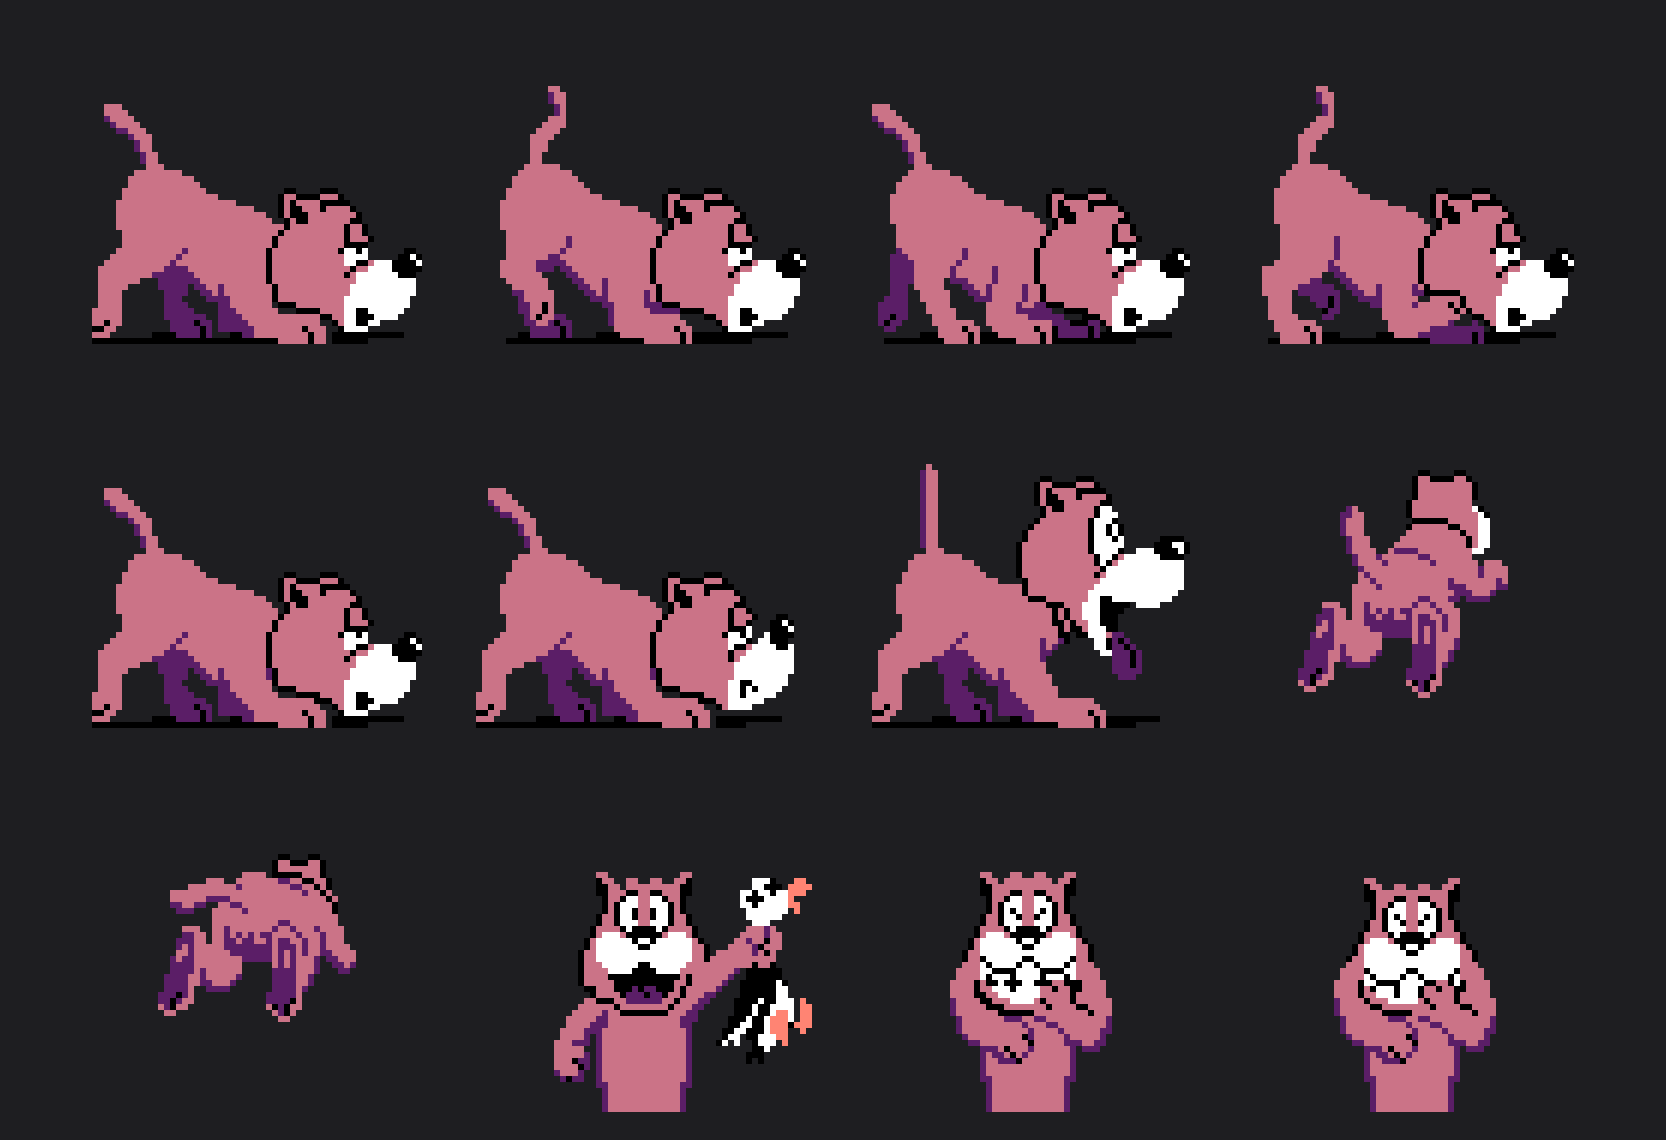
In Phaser, we first specify the dimensions of a frame in the loading logic of the spritesheet so that the framework knows how to slice the image into individual frames.
preload() {
  this.load.spritesheet("dog", "./graphics/dog.png", {
    frameWidth: 32,
    frameHeight: 32,
  });
}
Then, we can create an animation by defining its starting and ending frames.
create() {
  this.anims.create({
    key: "walk",
    frames: this.anims.generateFrameNumbers("dog", {
      start: 0,
      end: 3,
    }),
    frameRate: 8,
  });
}
To provide the needed frames we call the generateFrameNumbers method of Phaser’s animation manager.
Finally once the animation is created, it can be played by using the play method of the sprite game object.
this.player = this.add.sprite(500, 500, "dog");
this.player.play({key: "walk"});
If you want the animation to loop back indefinitely, add the repeat property and set it to -1.
this.player = this.add.sprite(500, 500, "dog");
this.player.play({key: "walk", repeat: -1});
Input Handling
A game needs to be interactive to be called a “game”. One way to handle input is by using event listeners provided by Phaser. For keyboard input, we can use this.input.keyboard.on() :
create() {
  const jumpLogic = () => {
    // You jump logic
  };
  this.input.keyboard.on("keydown-SPACE", jumpLogic);
}
And for handling mouse and touch input we can use this.input.on().
create() {
  const jumpLogic = () => {
    // You jump logic
  };
  this.input.keyboard.on("keydown-SPACE", jumpLogic);
  this.input.on("pointerdown", jumpLogic);
}
Sharing Data Between Scenes
At one point, you might need to share data between scenes. For this purpose, you can use Phaser’s registry. Here is an example of its usage.
export default class Game extends Phaser.Scene {
  constructor() {
    super({ key: "game" });
  }

  create() {
    this.registry.set("score", 100);
    this.scene.start("gameover");
  }
}
export default class GameOver extends Phaser.Scene {
constructor() {
super({ key: "gameover" });
}
create() {
const currentScore = this.registry.get("score");
// display the score
this.add.text(0, 0, currentScore);
}
}Playing Sound
To play sounds (assuming you have already loaded the sound first) you can use the play method of the sound manager.
preload() {
   this.load.audio("jump", "./sounds/Jump.wav");
}

create() {
   this.sound.play("jump", {volume: 0.5});
}
You can specify the sound’s volume in the second param of that method.
If you need to be able to stop, pause or play the same sound at a later time, you can add it to the sound manager rather than playing it immediately.
create() {
  this.citySound = this.sound.add("city", { volume: 0.2, loop: true });
  this.citySound.play();


  // later in your code in some game over condition.
  if (this.isGameOver) {
    this.citySound.stop();
  }
}
This comes in handy when you transition from one scene to another and you have a sound that loops indefinitely. In that case, you need to stop the sound before switching over otherwise the sound will keep playing in the next scene.
Physics, Debug Mode, Physics Bodies and Collision Logic
By default, Phaser offers an Arcade physics system which is not meant for complex physics simulations. However, it’s well suited for most types of games.
To enable it, you can add the following to your Phaser config.
const config = {
  //... omitted for clarity
  physics: {
    default: "arcade",
    arcade: {
      gravity: { y: 4000 },
      debug: false,
    },
  },
};

new Phaser.Game(config);
You can add an existing game object to the physics system the same way you add one to a scene.
export default class Player extends Phaser.GameObjects.Sprite {
  constructor(scene, x, y) {
    super(scene, x, y);
    scene.add.existing(this);
    scene.physics.add.existing(this); // <--
    this.body.setSize(22, 26);
  }
  // ...
}
This will create a physics body for that game object which is accessible with the body instance field. You can view this body as a hitbox around your sprite if you turn on the debug mode in your project’s config.
const config = {
  //... omitted for clarity
  physics: {
    default: "arcade",
    arcade: {
      gravity: { y: 4000 },
      debug: true, // <--
    },
  },
};

new Phaser.Game(config);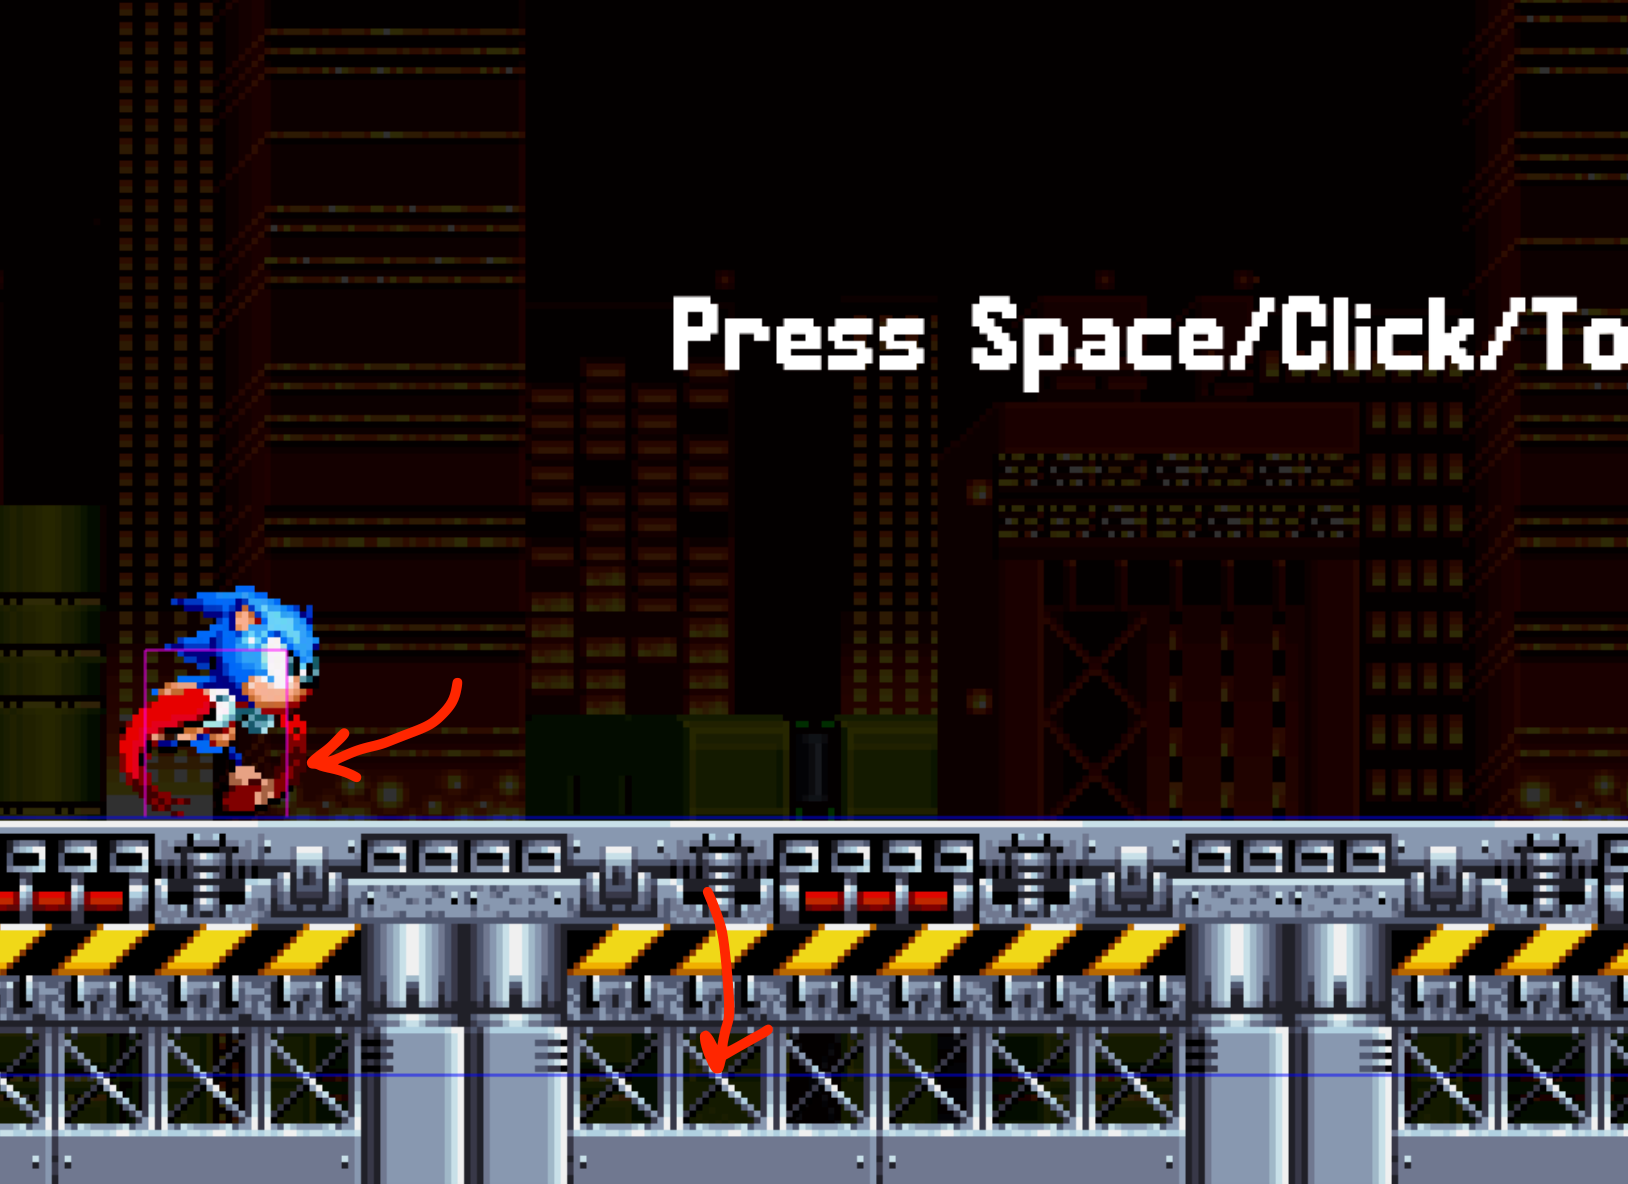
To create bodies that aren’t affected by gravity, like platforms, you can create a static group and then create and add static bodies to that group. Here’s an example :
// For example, in the create method of the Game scene
create() {
  const groundGroup = this.physics.add.staticGroup();
  this.ground = groundGroup.create(960, 920); // Create a single static body. Call this multiple times to create more.
  this.ground.setSize(1920, 160);
}
You can also add already existing physics bodies to a group.
create() {
  this.enemies = this.add.group();
  // assuming you have defined an Enemy class similarly to the one shown previously for the player.
  this.enemies.add(new Enemy(this, 100, 100))
}
Now, you might be wondering what groups are useful for? They shine in collision handling logic.
Let’s assume you have multiple enemies attacking the player. To determine when a collision occurs between any enemy and the player, you can set up the following collision handler :
create() {
  this.physics.add.collider(this.player, this.enemies, (_, enemy) => {
    // enemy is the specific enemy of the enemies group colliding with the player.
    console.log(enemy);
  });
}
Project Based Tutorial
There are many concepts I did not have time to cover. If you want to delve further into Phaser, I have a project based course you can purchase where I guide you through the process of building a Sonic themed infinite runner game.
This is a great opportunity to put in practice what you’ve learned here. If you’re interested, here’s the link to the course : https://www.patreon.com/posts/learn-phaser-4-147473030.
That said, you can freely play the game being built in the course as well as have access to the final source code.
Original Phaser game live demo : https://jslegend.itch.io/sonic-ring-run-phaser-4
Demo of the version built in the course : https://jslegend.itch.io/sonic-runner-tutorial-build
Final source code : https://github.com/JSLegendDev/sonic-runner-phaser-tutorial
Conclusion
If you enjoy technical posts like this one, I recommend subscribing to not miss out on future releases.
In the meantime, you can read the following :


