
You Can Now Make PS2 Games in JavaScript

I recently discovered that you could make PS2 games in JavaScript. I’m not even kidding, it’s actually possible. I was working on a project and had my phone near my desk when I received a notification. Upon further inspection, it came from itch.io which was a platform where I usually published most of my web games.
Under my relatively popular Sonic infinite runner game which was made in JavaScript and developed a year ago, I received a comment from someone with the username Dev Will which claimed they had made a PS2 version of my game and provided the GitHub repo of the source code.
At first, I thought that it was cool that someone took the time to remake my game for an old console that had a reputation to be hard to develop for and probably required them to write a lot of C or C++.
Out of curiosity, I opened up the GitHub repo and was astonished to see that the project was not using even a bit of C++ or C but was entirely in JavaScript!
If making PS2 games were easier than I thought since I could use a higher level language like JavaScript, I could probably try making one in a reasonable amount of time and play it on a retro handled or an actual PS2. How cool would that be?
This is where I knew I had to drop everything I was doing to investigate how this was possible.
The AthenaEnv Project
Since the dev behind the project was Portuguese speaking (I assume they were either from Brazil or Portugal), they wrote the Readme of the repo in Portuguese which was a language I did not understand.
Fortunately, I was still able to decipher most of what was written because I had done 3 years of Spanish in school and spoke French natively. Since Portuguese is a romance language like Spanish and French, I was fortunately not totally lost.
Anyway, The readme said that the engine used to make the PS2 version of my game was called AthenaEnv with a conveniently placed link towards it so I could learn more.
As with the Sonic Infinite Runner PS2 project, this engine was also open source and its repo had a very detailed readme written in English.
To summarize, Athena was not what we commonly refer to as a game engine but an environment that also offered a JavaScript API for making games and apps for the PS2. It embedded a slightly modified version of QuickJS which was a small and embeddable JavaScript engine. This explained how Athena was able to run JavaScript code on the PS2.
Therefore, Athena was the PS2 native program written in C that took your JavaScript code, passed it through the QuickJS engine to interpret it and finally, ran the relevant logic on the system.
What made it compelling was not that it just ran JS on the PS2 but that it offered an API suitable for game development. It covered :
Rendering : Allowing you to display sprites, text, shapes, etc… on the screen and animate them using a game loop.
Asset loading : Allowing you to load images, sounds, fonts, etc...
Input handling : Allowing you to receive player input from a controller, multiple ones or even from a mouse and keyboard since the PS2 supported these input methods.
File handling : Allowing you to write save files among other things.
Sound playback : For playing Sound.
and the list goes on.
I noticed however, that the level of abstraction offered by the API was similar to something like p5.js, the HTML canvas API or Raylib. That meant that you’d still needed to implement collision detection, scene management, etc… yourself.
Now, that I got familiar with Athena, I wanted to try to run the Sonic infinite runner “port” on an emulator. According to the project’s Readme. I needed to install PCSX2 which is the most popular emulator for the PS2. Then, go into the settings and under the emulation tab, check the box “Enable host filesystem”.
Once this was done, I would need to open an athena.elf file and the game would start.
After installing and configuring the emulator, I was ready to run the game. However, there was a problem. I could not find the athena.elf file in the repo. It was nowhere to be found.
This is where I remembered to look at the “releases” section of the repo because a lot of open source projects put executables there, especially if it’s a mobile or desktop app project.
As expected, the zip attached in that section contained the athena.elf file but not only. It also contained an assets folder, a main.js file, an athena.ini file and src folder containing the rest of the game’s code.
The athena.ini file allowed you to configure the entry point of the project. Here, the entry point was set to main.js which explained how Athena would know what JavaScript to run. You could also configure if you wanted to show Athena’s logo before your game started by setting the boot_logo property to true.
boot_logo = true
dark_mode = true
default_script = “main.js”

audsrv = true
It now became evident why we needed to check the “Enable host filesystem” check box earlier. This was so that the emulator could allow Athena to access the assets folder and the source code that were essential for our game.
Anyway, I opened the athena.elf file in PCSX2 and surprisingly, the game actually ran with no issues. It was amazing to see that a game I wrote for the web was ported to the PS2 and I was there able to play it with a controller.
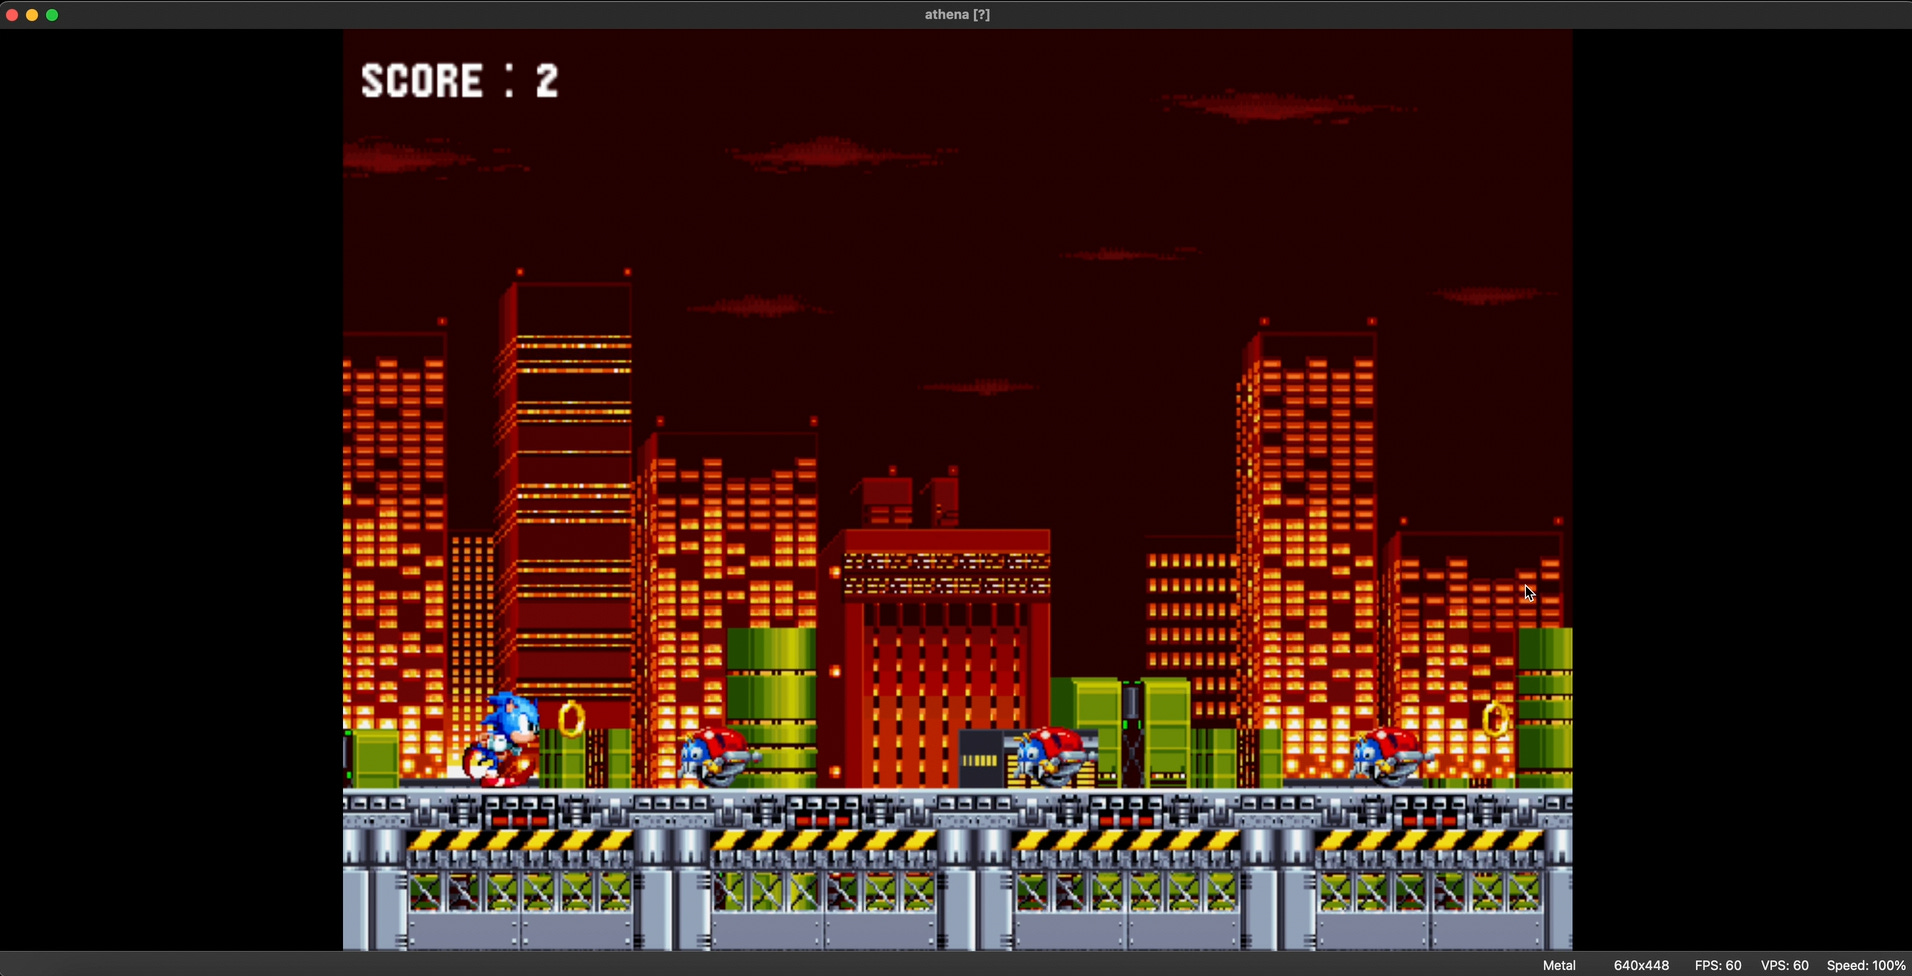
Now, the game looked a bit blurry which was expected since this was supposed to emulate a PS2 which had a small resolution. Fortunately, I was able to make things more comfortable by upping the resolution in the graphics settings of the emulator.
The dev process also seemed quite straightforward. You would only need to open the folder containing all the relevant files (athena.elf, main.js, etc…) in a code editor like VSCode and open athena.elf in the emulator. Now, you could make changes to your JS code and once you were ready to test, you would go under the PCSX2 system tab and click on reset. This would restart the emulator and you could see the latest changes. While not as seamless as in web development with hot reloading, it still was a relatively fast iteration cycle.
It’s at that moment, that I knew had to make a post about it and share this awesome project with you. However, I still felt uneasy about one thing.
Nowadays, people download PS2 games as .iso files. For most games, you only need one .iso file that you then open in your emulator. Less technical people can therefore more easily enjoy these older titles.
However, to run the Sonic infinite runner game “port”, I needed to not only check a box in the settings but also needed the entire project’s folder containing the Athena executable and the source code.
I wondered if instead, there was a way to distribute the game as a single .iso file. This is were I simply went back to the itch.io comment section and asked if it was possible.
After a thorough back and forth that continued on Discord, the process to convert my files into a single iso, I could distribute, was now clear.
Making an .iso File
To make an iso you needed the following files :
athena.elf : Which is the Athena executable.
athena.ini : For configuring the project’s entry point.
A JS file acting as the entry point of the codebase.
The rest of your source code if your code is more than one file, oftentimes it’s in a folder called src.
Two files one named ATHA_000.01 and the other SYSTEM.CNF needed to make the iso bootable.
As an aside, in case you want to also get into JavaScript PS2 game development, you can check this template I made containing all of the files needed.
Once you had all the files, you had to make a zip archive containing them all. One issue I had, was that if I created a zip out of the folder containing the files, the resulting .iso would not work. However, if I selected the files one by one and then created the zip, I would experience no issues. This is something to keep in mind.
Now, the only step left was to convert the zip into an iso. As I was using a Mac, the only reliable way I’ve found, was to use the website mconverter.eu and let them do the conversion.
However, the issue with this website is that you’re limited in the number of conversions you can do per day before they ask you to pay. Additionally, if your zip archive is above a certain size, you’ll also have to watch an ad before you can do the conversion.
If you end up finding a better way using either a CLI tool, a downloadable app or some other website, feel free to share it in the comment section.
Once you had the iso, you could open it up in the emulator like you would do with other PS2 games. You also didn’t need to check the “Enable host filesystem” option anymore since all the relevant files needed were included in the iso.
If the game booted correctly, then you now had a single file you could distribute which was very convenient.
Hello World Example
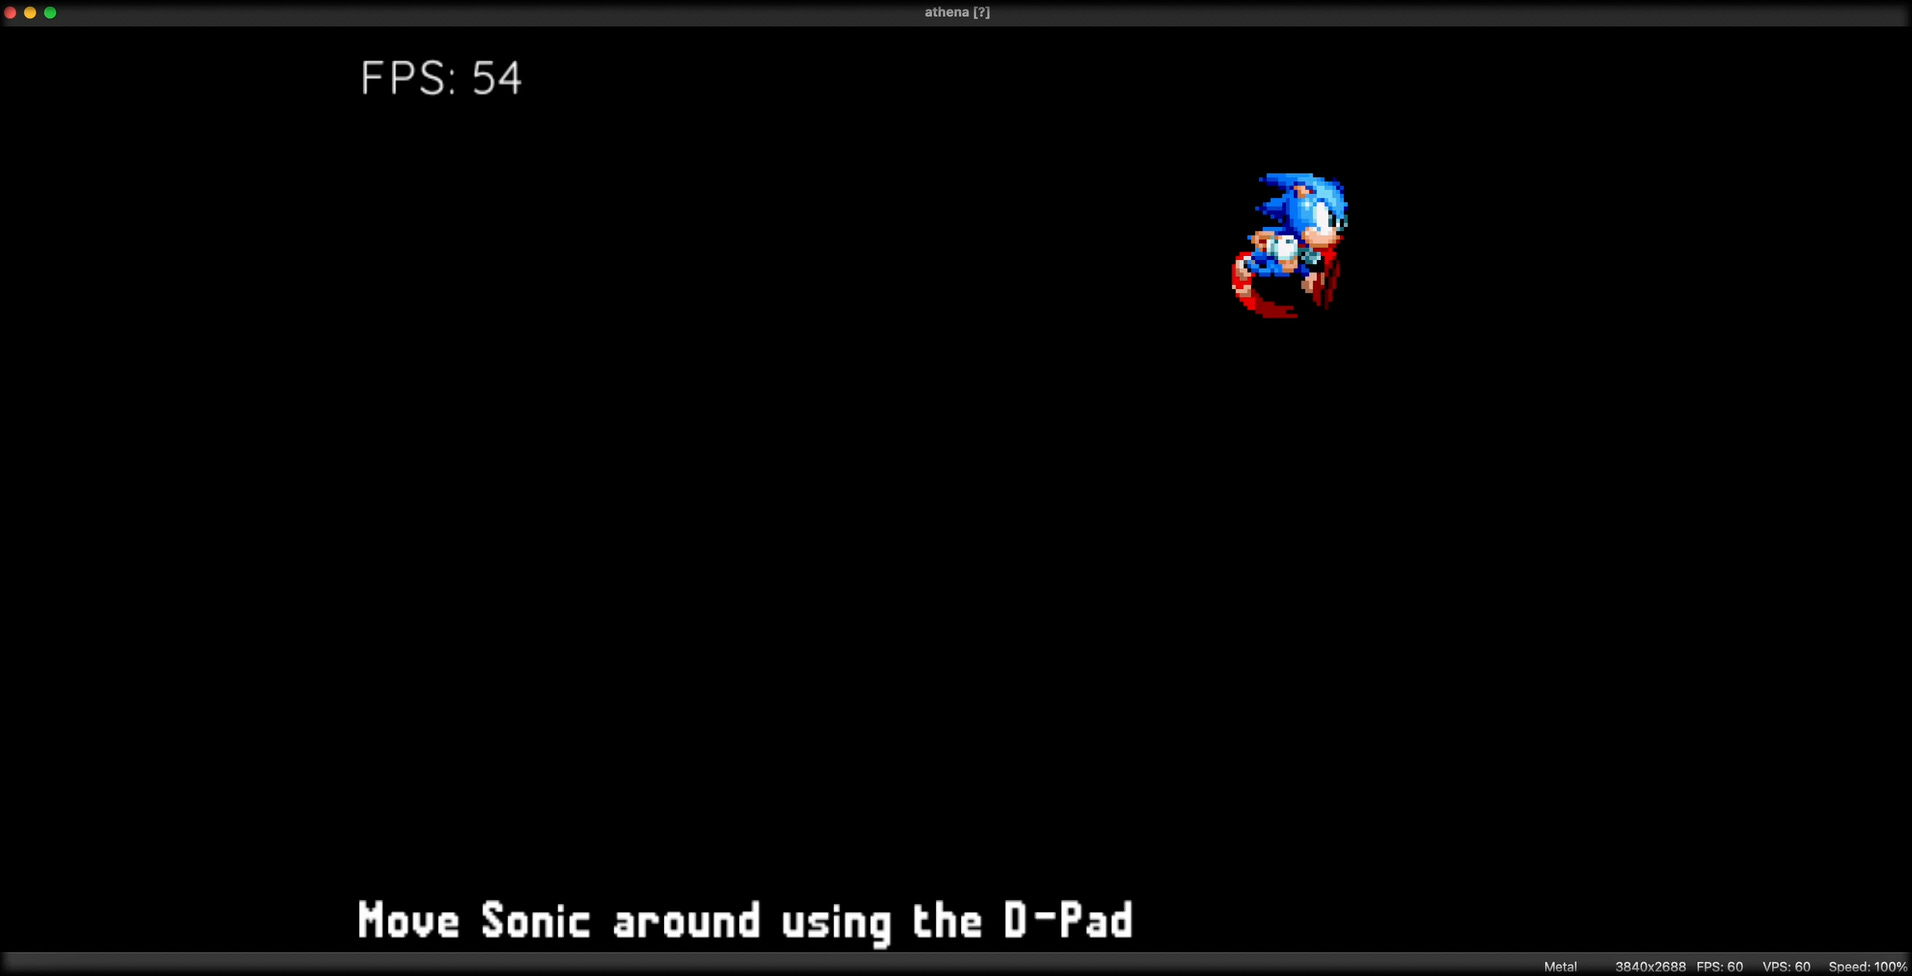
It was now time to get my feet wet. Before attempting anything too complicated, my goal was to create a simple “Hello World” example where I would :
Load some assets (In my case a font and an image).
Set up a game loop that would run every frame.
Animate a sprite using that game loop.
Render text.
Handle player input so I could move a sprite around.
Setup
Before I could achieve any of these sub-goals, in main.js, I first defined a few constants that I would end up needing.
const { width: SCREEN_WIDTH, height: SCREEN_HEIGHT } = Screen.getMode();
const SCALE = 2;
const SPEED = 3;
const FRAME_WIDTH = 32;
const FRAME_HEIGHT = 44;
This is where I learned that you could get the screen’s width and height by first using the Screen module available globally like all Athena provided modules (Meaning that no import statements were needed) and then calling the getMode method.
Then, to have a stable frame rate and accurate FPS counting, I needed to call the methods setVSync() and setFrameCounter()
Screen.setVSync(true); // makes framerate stable
Screen.setFrameCounter(true); // toggles frame counting and FPS collecting.
Loading Assets
With the setup completed, I wanted to load the font I used in my Sonic game and a Spritesheet of Sonic so that I could later animate it. I could achieve the following by creating an instance of the Font and Image classes offered by Athena.
const maniaFont = new Font("./assets/mania.ttf");
const sprite = new Image("./assets/sonic.png");
Setting Up Player Input
While I planned on handling player input later, I still needed a way to get the player’s controller so that my code could know when a given button was pressed. This was made possible by using Athena’s Pads module.
// Get the first player controller
// First player -> 0, Second player -> 1
const pad = Pads.get(0);
Setting Up Animation Logic
Before I could create a game loop, I needed to first write the setup code required to animate my spritesheet. Since all the frames where contained within a single image, I had to find a way to tell Athena what part of the image was to be rendered.
To achieve this, I first spent some time to get familiar with the shape of the sprite object created earlier.
const sprite = new Image("./assets/sonic.png");It turned out that we could set the width and the height of the sprite by modifying the properties of the object with the same names.
// for example
sprite.width = 30;
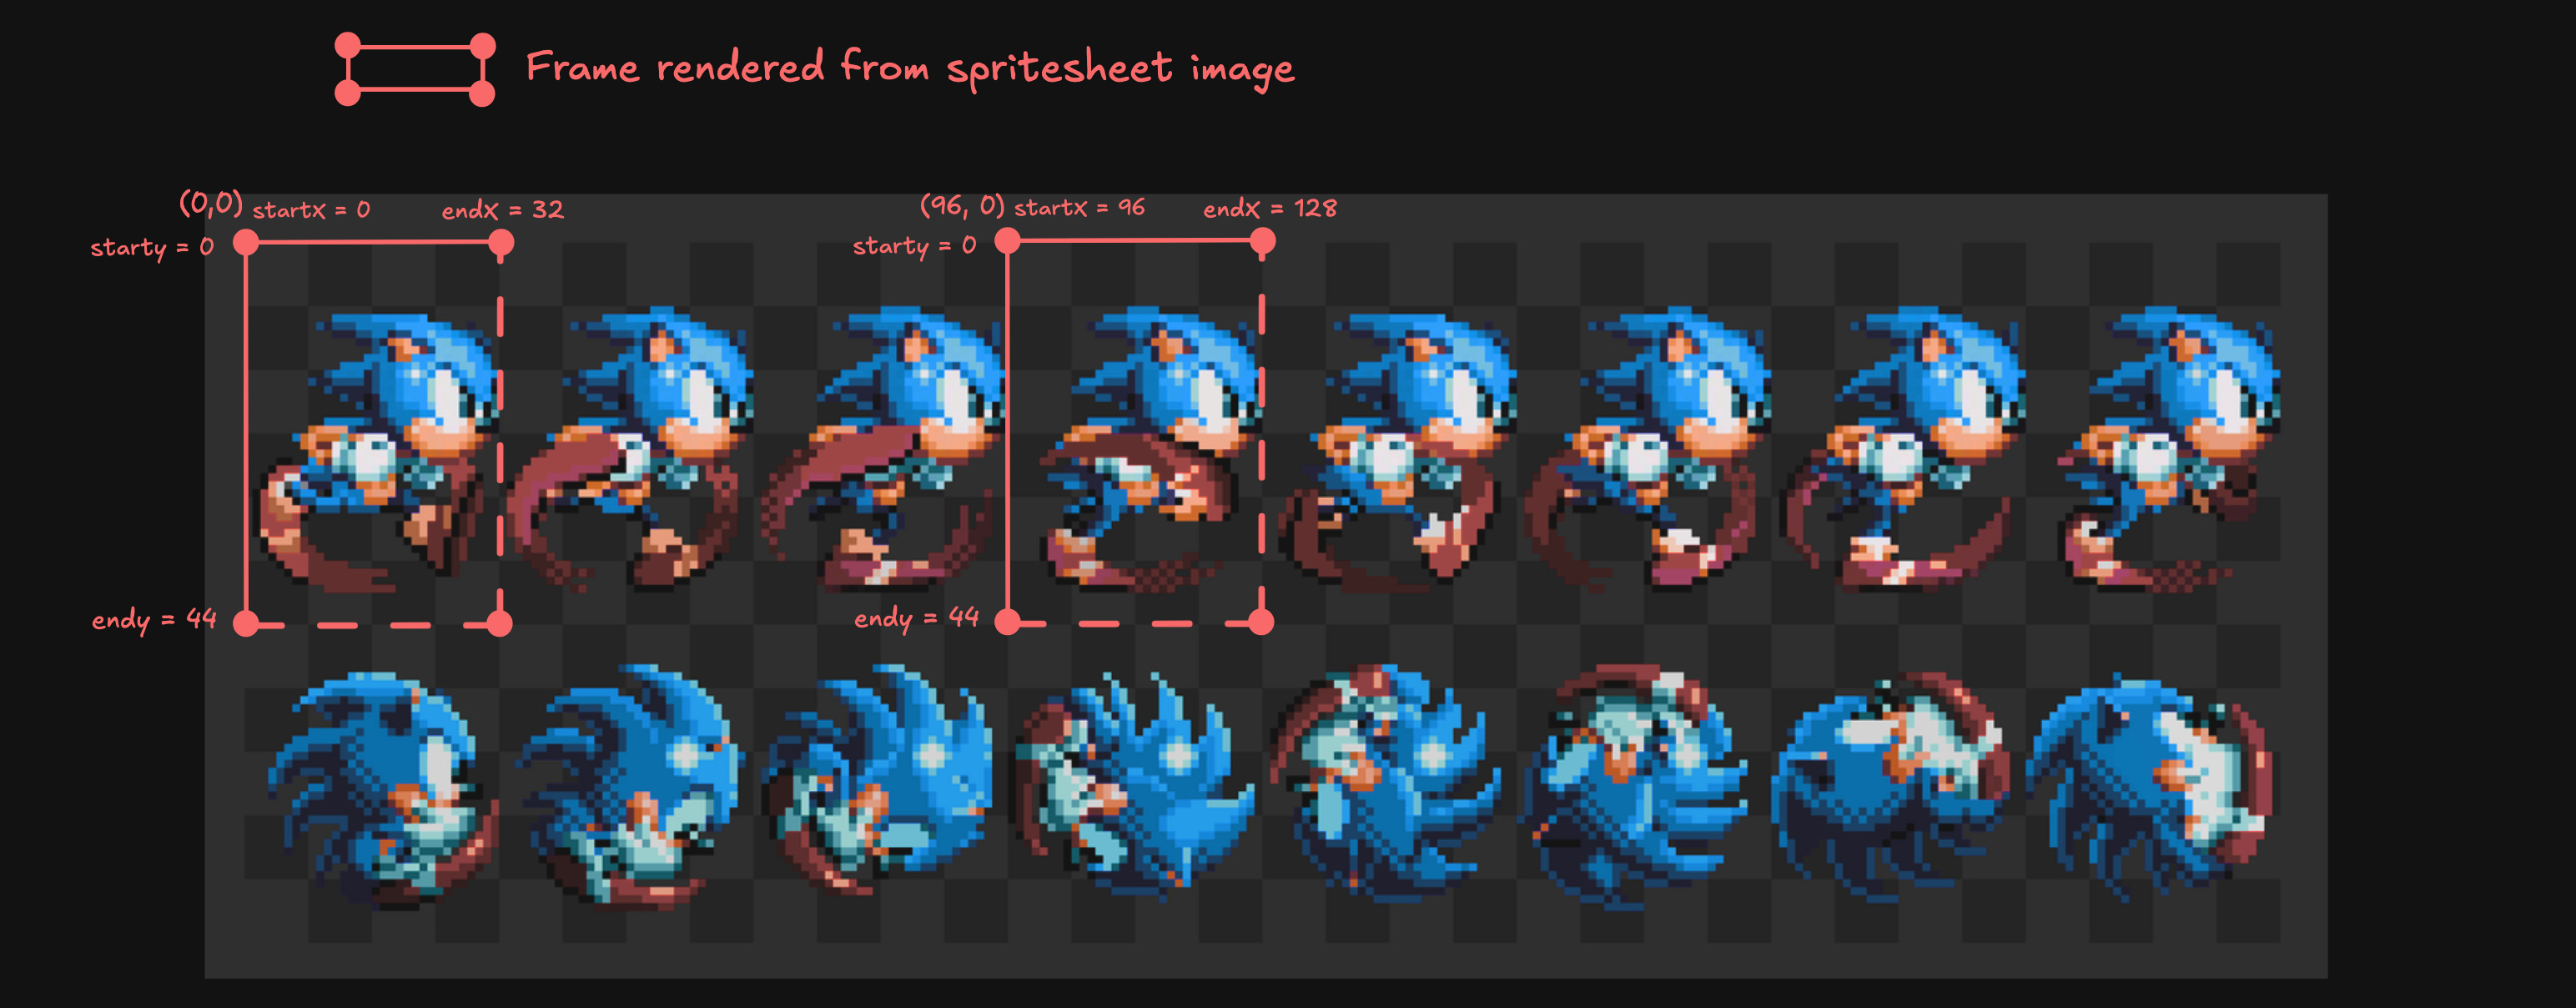
sprite.height = 40;It also turned out that you could tell Athena what portion of the image to draw by setting the startx, endx, starty, endy properties.
sprite.startx = 0;
sprite.endx = 32;
sprite.starty = 0;
sprite.endy = 44;
For example, if you had the following values : startx = 0, endx = 32, starty = 0 and endy = 44 you would get the first frame rendered. This is because in the spritesheet, every frame has a width of 32 and a height of 44. Also, the origin (0,0) corresponds to the top-left corner of the spritesheet.
Now that I knew how to display a single frame within a wider image, I used the following logic to setup Sonic’s run animation.
const spritePos = { x: SCREEN_WIDTH / 2, y: SCREEN_HEIGHT / 2 };
sprite.width = FRAME_WIDTH * SCALE;
sprite.height = FRAME_HEIGHT * SCALE;
// describes where each frame is located within the sprite.
const runAnimFrames = [
  { startx: 0, endx: 32, starty: 0, endy: 44 },
  { startx: 32, endx: 64, starty: 0, endy: 44 },
  { startx: 64, endx: 96, starty: 0, endy: 44 },
  { startx: 96, endx: 128, starty: 0, endy: 44 },
  { startx: 128, endx: 160, starty: 0, endy: 44 },
  { startx: 160, endx: 192, starty: 0, endy: 44 },
  { startx: 192, endx: 224, starty: 0, endy: 44 },
  { startx: 224, endx: 256, starty: 0, endy: 44 },
];
let frameIndex = 0;
const frameDuration = 30;
const timer = new Timer();
I first created an object called spritePos to set the position of the sprite on the screen. This was needed to be able to move it around when the player would press directional buttons on the D-pad. More on that later.
Then I would set the sprite’s width and height to correspond to the width and height of a single frame which was 32x44 pixels. Since I wanted the sprite to appear big enough, I multiplied the width and height by a value defined by the SCALE constant we set earlier in our code.
The next step consisted in creating an array called runAnimFrames which would describe each frame of Sonic’s run animation using an object with the startx, endx, starty and endy properties. We then had a frameIndex variable which would determine the current frame to display. The frameDuration constant would be used to set how long in miliseconds to display each frame. The lower the number the higher the frame rate of the animation because we would flip through all the frames faster.
Finally, I initialized a timer coming from a custom Timer class that I added in my src folder and imported here. The full code is available in the template mentioned earlier.
The timer would end up being crucial to know when it was time to move on to displaying another frame.
Creating our Game Loop
Now that we had our animation logic setup done, it was time to render the animation. For this purpose, I needed a game loop that runs every frame. In Athena, we could achieve this by calling the display method available under the Screen module.
Screen.display(() => {
   if (timer.get() > frameDuration) {
      if (frameIndex < runAnimFrames.length - 1) {
          frameIndex++;
          timer.reset();
      } else {
          frameIndex = 0;
      }
   }

   sprite.startx = runAnimFrames[frameIndex].startx;
   sprite.endx = runAnimFrames[frameIndex].endx;
   sprite.starty = runAnimFrames[frameIndex].starty;
   sprite.endy = runAnimFrames[frameIndex].endy;
   sprite.draw(spritePos.x, spritePos.y);
});
In an if statement we would check if the timer had exceeded the time allocated to displaying the current frame. If it was the case we would move on to the next frame by incrementing the frameIndex as long as it was within the bounds of the runAnimFrames array, otherwise, we would set it back to 0 to display the first frame. This was to achieve a looping animation.
Then, on every iteration of the game loop we would set the sprite’s startx, endx, starty, endy properties to correspond to the ones of the current frame. Finally, to render the sprite, we needed to call its draw method and pass to it the coordinates where you wanted to display it on the screen.
Handling Player Input
Now that I had a game loop, I could finally handle user input by making sure that the sprite would move in different directions depending on which button was pressed. This could be easily achieved with a few if statements.
Screen.display(() => {
   pad.update(); // necessary to get what buttons are currently being pressed

   if (pad.pressed(Pads.RIGHT)) {
       spritePos.x = spritePos.x + SPEED;
   }

   if (pad.pressed(Pads.LEFT)) {
       spritePos.x = spritePos.x - SPEED;
   }

   if (pad.pressed(Pads.UP)) {
       spritePos.y = spritePos.y - SPEED;
   }

   if (pad.pressed(Pads.DOWN)) {
      spritePos.y = spritePos
   }

   // rest of the code omitted for clarity
});
You might be wondering where is deltaTime? For those unfamiliar, deltaTime is a value representing the time elapsed between the current frame and the previous frame in a game. It’s often used to make the movement of objects, frame rate independent. Meaning that if your game runs at a lower or higher frame rate, an object, like a character, will still move at the same rate. To achieve frame rate independence, you would usually multiply your movement code by deltaTime.
The reason it was absent here, is because when creating a game loop using the display method, this matter is taken care of under the hood.
Mirroring a Sprite
Now that I could move Sonic around, I still needed him to face the correct direction because at this point, he would look right even If I moved him to the left. To implement this, I decided to go with a common technique in pixel art based games, which consisted in mirroring (or flipping) the sprite.
To achieve this in Athena, you simply needed to provide a negative width or height to the sprite depending on what axis you wanted the mirroring to take effect on. For flipping a sprite horizontally, providing a negative width was enough.
However, an issue arose! If you flipped the sprite, it would not flip in place since it would flip according to the sprite’s origin which was its top-left corner.
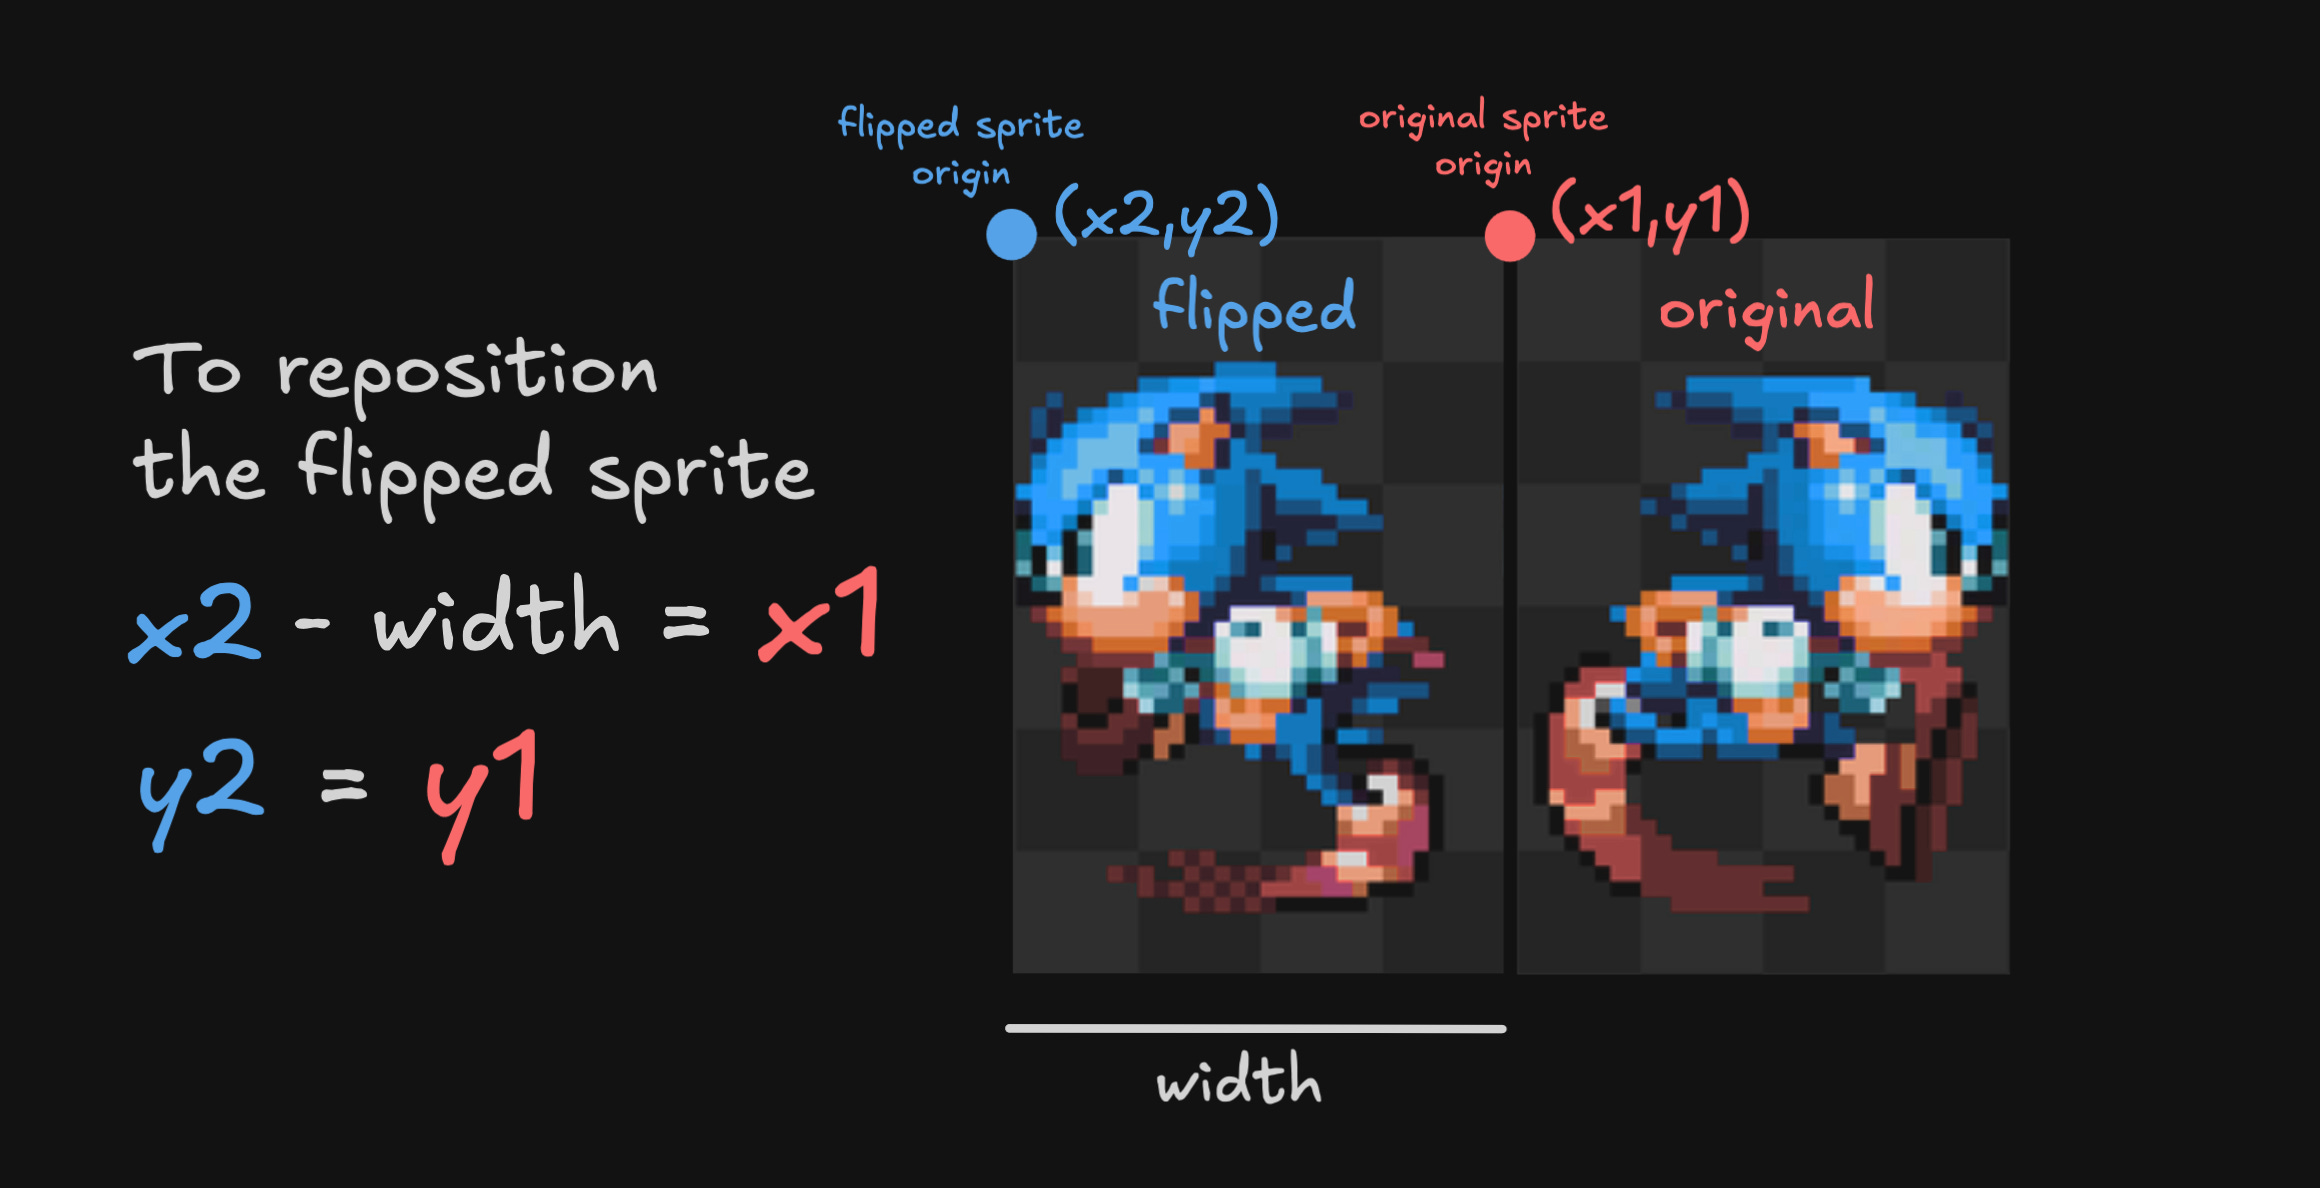
This meant that it would move the sprite to the left after mirroring. To fix this issue, you only needed to subtract an offset to the x coordinate of the flipped sprite that corresponded to its width.
Now that the issue was solved, I created variable called spriteIsFlippedX to know when to flip or unflip the sprite. The logic can be see below :
// omitted previous code for clarity
const offset = FRAME_WIDTH * SCALE;
let spriteIsFlippedX = false;

Screen.display(() => {

  pad.update();

  if (pad.pressed(Pads.RIGHT)) {
    // makes sur to flip back the sprite
    if (spriteIsFlippedX) {
      sprite.width = Math.abs(sprite.width);
      spriteIsFlippedX = false;
      spritePos.x -= offset;
    }

    spritePos.x = spritePos.x + SPEED;
  }

  if (pad.pressed(Pads.LEFT)) {
    if (!spriteIsFlippedX) {
      sprite.width = -Math.abs(sprite.width);
      spriteIsFlippedX = true;
      spritePos.x += offset;
    }

    spritePos.x = spritePos.x - SPEED;
  }

  if (pad.pressed(Pads.UP)) {
    spritePos.y = spritePos.y - SPEED;
  }

  if (pad.pressed(Pads.DOWN)) {
    spritePos.y = spritePos.y + SPEED;
  }

  // ... code omitted for clarity
});
Now, when you moved sonic to the left, he would face left and face right when moved to the right.
Rendering Text
There was still one thing I wanted to try out before wrapping up my Hello World example and that was text rendering. The first thing I wanted to render onto the screen was an FPS counter. It turned out that the FPS counter in the PCSX2 emulator is not accurate, however, Athena provides the getFPS() method available on the Screen module to accurately determine the frame rate.
To display some text, you needed to first create a font object using the Font constructor. It would take either a path to a font that can be in a .ttf format or the string “default” if you wanted to use the default font available on the system.
Once created, the font object had a print method that you could use within the game loop to tell the PS2 what to render and where on the screen.
const font = new Font("default");
Screen.display(() => {
    // Here getFPS() will provide an updated FPS count every 10ms.
    font.print(10,10, Math.round(Screen.getFPS(10)));
});
const maniaFont = new Font("./assets/mania.ttf");
Screen.display(() => {
font.print(10,10, "Hello World!");
});Finally, my Hello World example was finished.
Now that you’ve been introduced to Athena, you might be tempted to try it out for yourself. In that case, I really recommend looking at the Sonic infinite runner Athena port’s code as you’ll learn a lot about concepts that I did not have time to cover here.
Link to the repo here : https://github.com/DevWill-hub/Sonic-Infinite-Runner-PS2
Link to my Athena template : https://github.com/JSLegendDev/Athena-PS2-Template
Link to the Athena project : https://github.com/DanielSant0s/AthenaEnv
Additionally, I recommend joining the official Athena discord where you’ll be more likely to receive help when stuck. You can join here : https://discord.gg/cZUH5U93US
How About 3D?
Before wrapping up this post, you might have found strange that nothing was mentioned about 3D considering that the PS2 was mostly known for its 3D games.
This is for 2 reasons. First, I’m a novice in terms of 3D game develoment, I have never done it before. Second, to my understanding, Athena has both 2D and 3D capabilities but version 4 which has more of a 3D focus is currently in development. I thought it would have been preferable to wait until v4 was stable before diving into PS2 3D gamedev in JavaScript.
However, there are a few 3D demos you can check if you’re interested.
Links down below.
Conclusion
To conclude, Athena is a cool project allowing you to make real PS2 games in JavaScript. If you learned something new and enjoy technical posts like this one, I recommend subscribing to not miss out on future releases.
In the meantime, if you feel inclined, you can read the post below.
How do Devs Make Levels Without Game Engines?

The story of how I started game development is quite unusual, which led me to not using game engines and allowed me to get familiar with alternative tooling.
>If you end up finding a better way using either a CLI tool, a downloadable app or some other website, feel free to share it in the comment section.
So, this motivated me. I hate having to go to potentially shady websites for conversion tools and thought I'd whip up a cli tool. I realized that the app you referred to likely shells out to mkisofs (or some equivalent based on OS of the webserver) but making a cli tool that invokes a particular subprocess based on OS (and assuming such a tool is installed on the user's OS) seemed an unappealing route for me.
But also, reading the ISO9660 spec and implementing it just for a simple zip2iso cli tool didn't seem all that appealing either. It occurred to me that this might be a great use case to test what all the hubbub around Gemini3 Pro vibe coding was about. While it's first shot output was not without errors and there was some manual editing to be done, it was quite useful and impressive and made a potentially bad return in time investment script idea about a 10 minute process (including creating zips and ISO's for testing, mounting them to verify, etc.)
TL;DR:
Ask and ye shall receive.
https://github.com/scottvr/GENISO
contains a single file python cli tool that will convert a zip file to an iso file, with no external dependencies.
This was super helpful. Do you need the ps2 sdk on top of Athena for it to function?