
How do Devs Make Levels Without Game Engines?

The story of how I started game development is quite unusual, which led me to not using game engines and allowed me to get familiar with alternative tooling.
When I reached the age to go to university, I chose computer science as my major not to learn to make games but with the aim of studying AI. However, by the time I ended up graduating, my interest for AI had completely vanished. The math needed for it did not interest me.
Instead, I used to spend my time building web related projects which I then put on my resume and was able to land a job as a software developer. In that job, we used a JavaScript and TypeScript based stack.
It was during that time that I came across a nice little library called Kaboom.js. It would end up later as KAPLAY. This library would allow you to make 2D games quickly using either JavaScript or TypeScript. As someone with no real experience in game dev, this was right up my alley as I already had the prerequisites to learn this library quickly.
Considering that this was a library and not a game engine, the development setup was quite familiar with what I was used to in my day job (at the very least the frontend portion of it). You would write your code in an editor and look at the preview in your browser.
My first few games were simple, they would take place in a single scene and I would hard code the positions of game objects into my code.
As my projects got bigger, I started to use a feature provided by Kaboom.js allowing me to describe the layout of a level using an array of strings. For each character, you could tie a specific game object that would be spawned according to where the character was located in the string array.
// An example
const myLevel = add([
    level(
        [
            "         ",
            "         ",
            "  @  ^ $$",
            "  =======",
        ],
        {
            tileWidth: 64,
            tileHeight: 64,
            tiles: {
                "@": () => [
                    sprite("bean"),
                ],
                "=": () => [
                    sprite("grass"),
                ],
                $: () => [
                    sprite("coin")
                ],
                "^": () => [
                  sprite("spike")
                ],
            },
        },
    ),
]);
While this was much better than hard coding coordinates, it became tedious when I wanted to make maps with multiple layers since each layer was represented with its own array of strings. Therefore, I wouldn’t know how the map would really look like unless I ran the code. It also felt annoying to reposition objects by adding spaces in a string or removing them.
Dissatisfied with the string-based approach, I decided to search how others tackled the problem.
I first got familiar with how game engine users did things. For Unity, Godot or Unreal they were all provided a built-in editor where they could easily place objects around and run their games.
It dawned upon me why people preferred to use ready made game engines due to how convenient this was but I didn’t feel like spending the time to learn an engine just for this. However, if I couldn’t find a solution that was better then what I had, I would probably bite the bullet and start learning game dev from scratch with one of the major engines.
I then came across developers with an approach that seemed a bit crazy. They just decided to invest time in building their own tooling for map/level making. As a programmer, while I appreciate the exercise, I felt that this was not worth my time unless, I had really no options and with the goal of making an editor that was general enough that I could sell as a product to other developers.
This is where I wondered: Has no one made a general-purpose editor for map-making that can be used by anyone working with libraries and game frameworks rather than engines? This prompted me to do some research, I came across 3 options :
I first found out about Ogmo when I tried learning the HaxeFlixel game framework. In the official tutorial, they used Ogmo to design the tutorial game’s map. Since, I didn’t end up pursuing HaxeFlixel much further. I kind of forgot about Ogmo and moved on.
As for LDTK, it was an editor made by the developers behind the popular game Dead Cells. It looked nice, but I ended up using Tiled because it was the most popular.
According to their home page, Tiled was used to design the levels of popular indie games like Shovel Knight and Axiom Verge amongst others. However, the reason that really pushed me over to use it over other options, was the fact that someone had written a plugin to integrate maps made with Tiled with the library I was using.
Learning Tiled
At first, Tiled’s interface looked ugly and not very intuitive but ultimately the way it worked was relatively simple.
You first started by creating a map by setting the size of each tiles and its width and height.
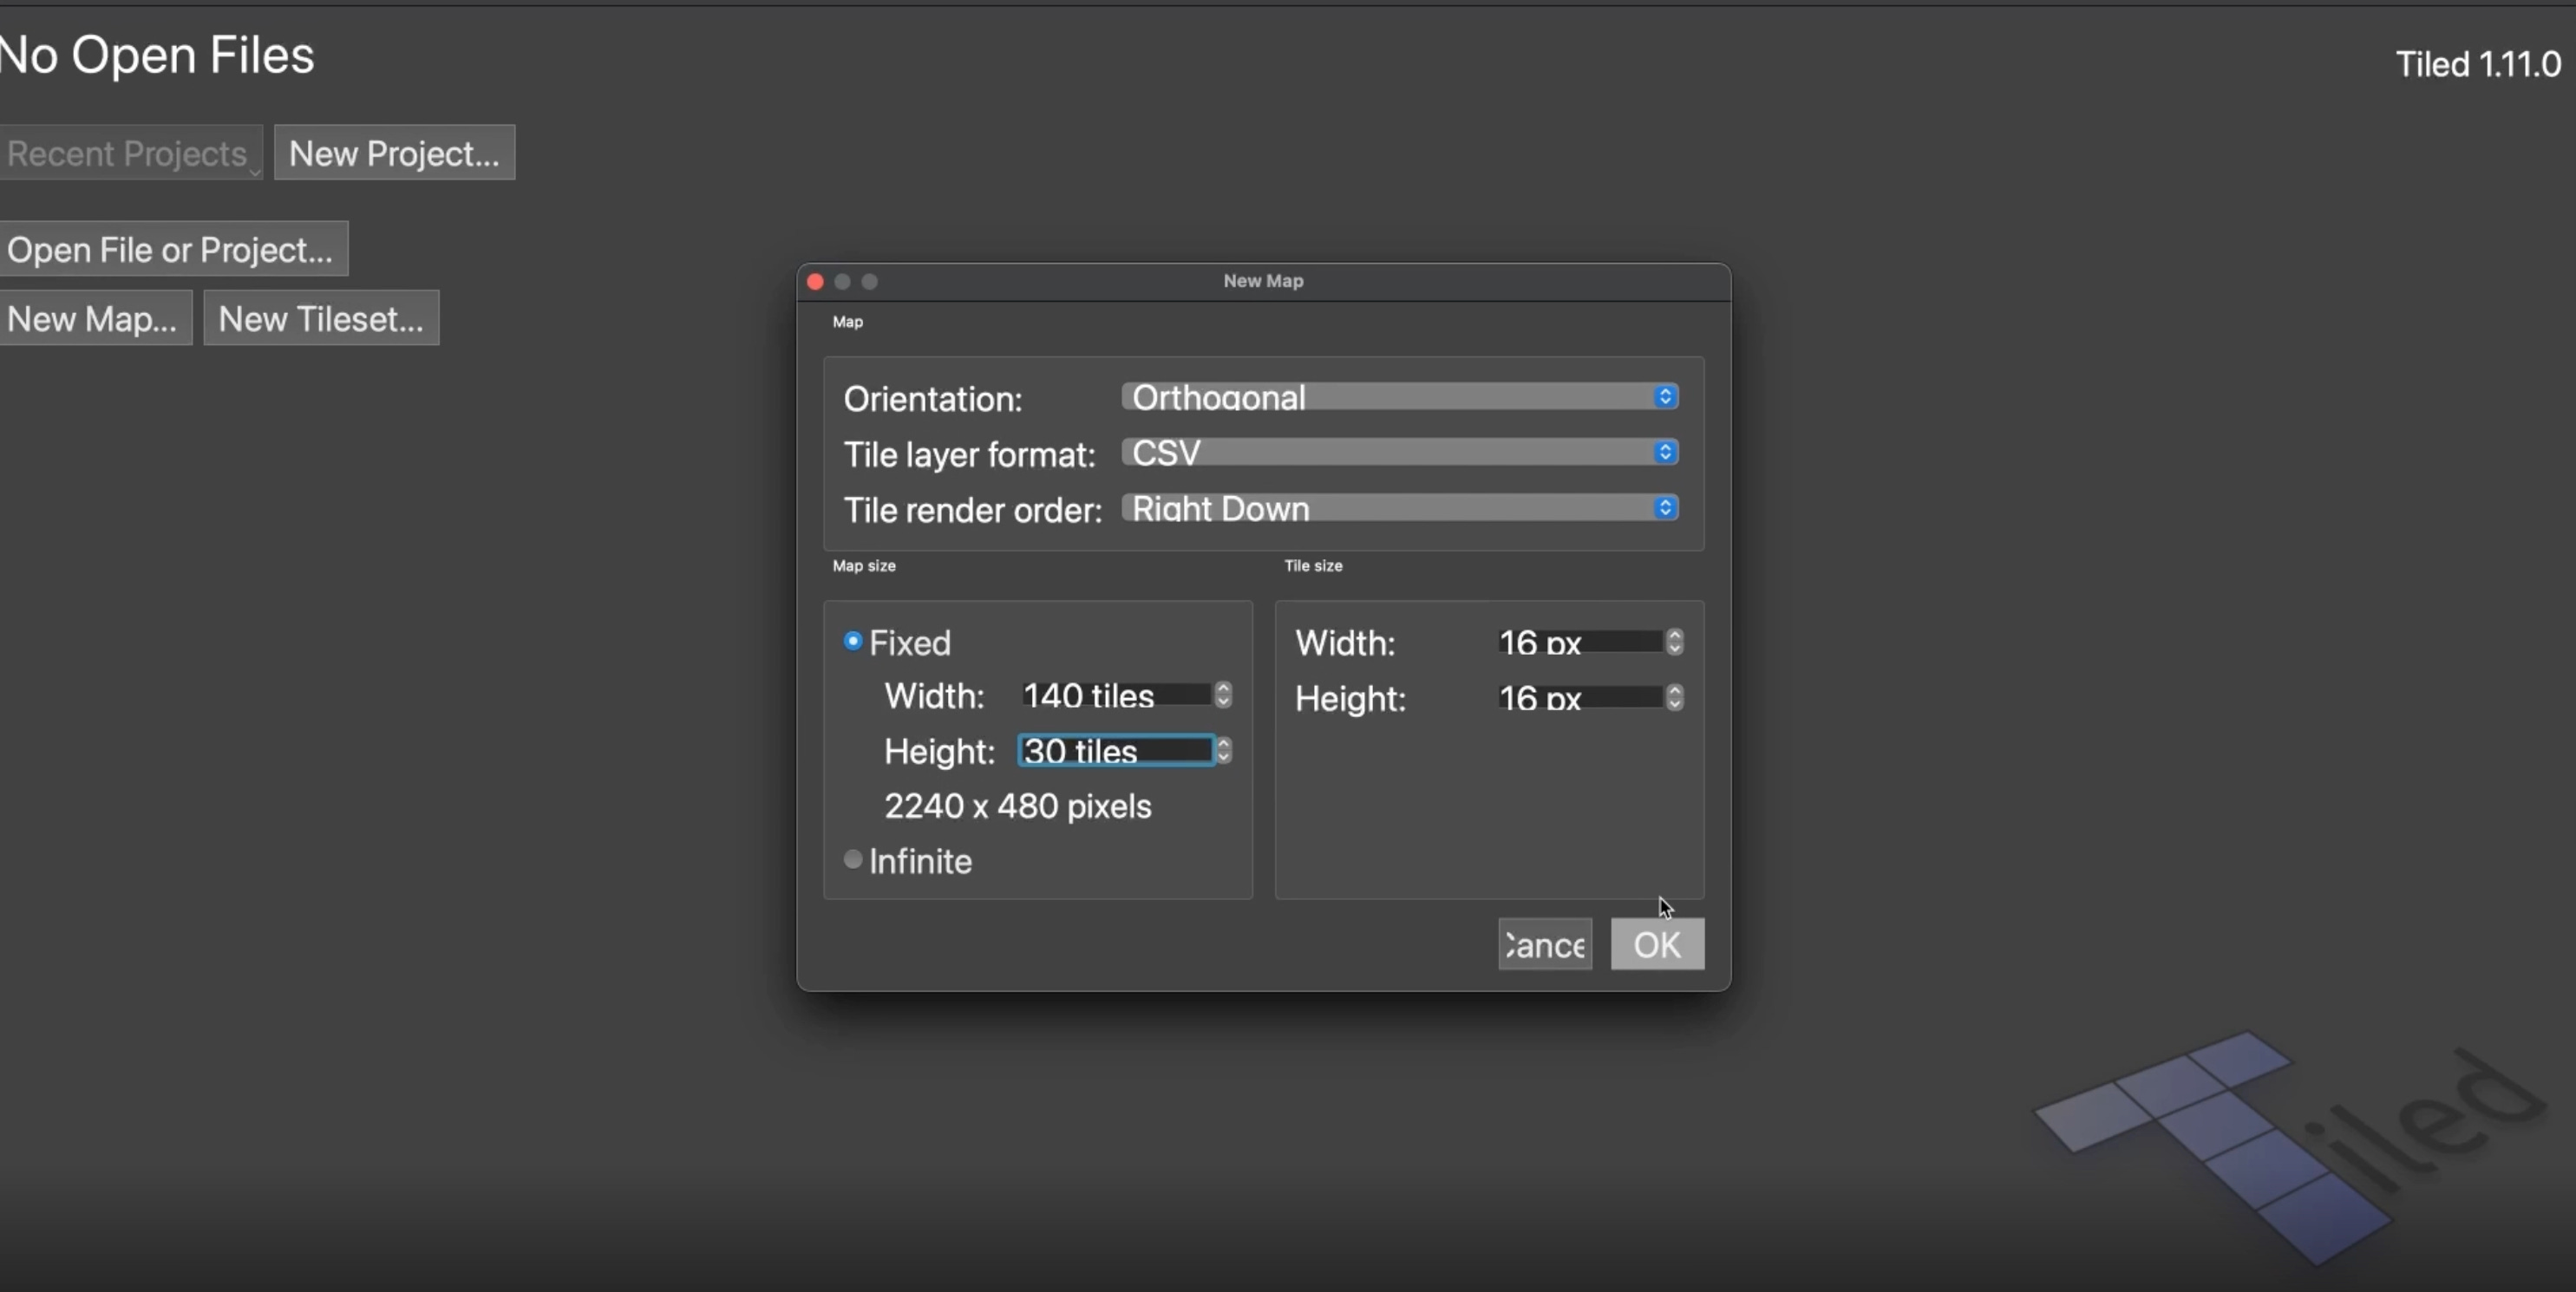
You then, imported your tileset and finally created a first tile layer on which you could draw using tiles from that tileset.
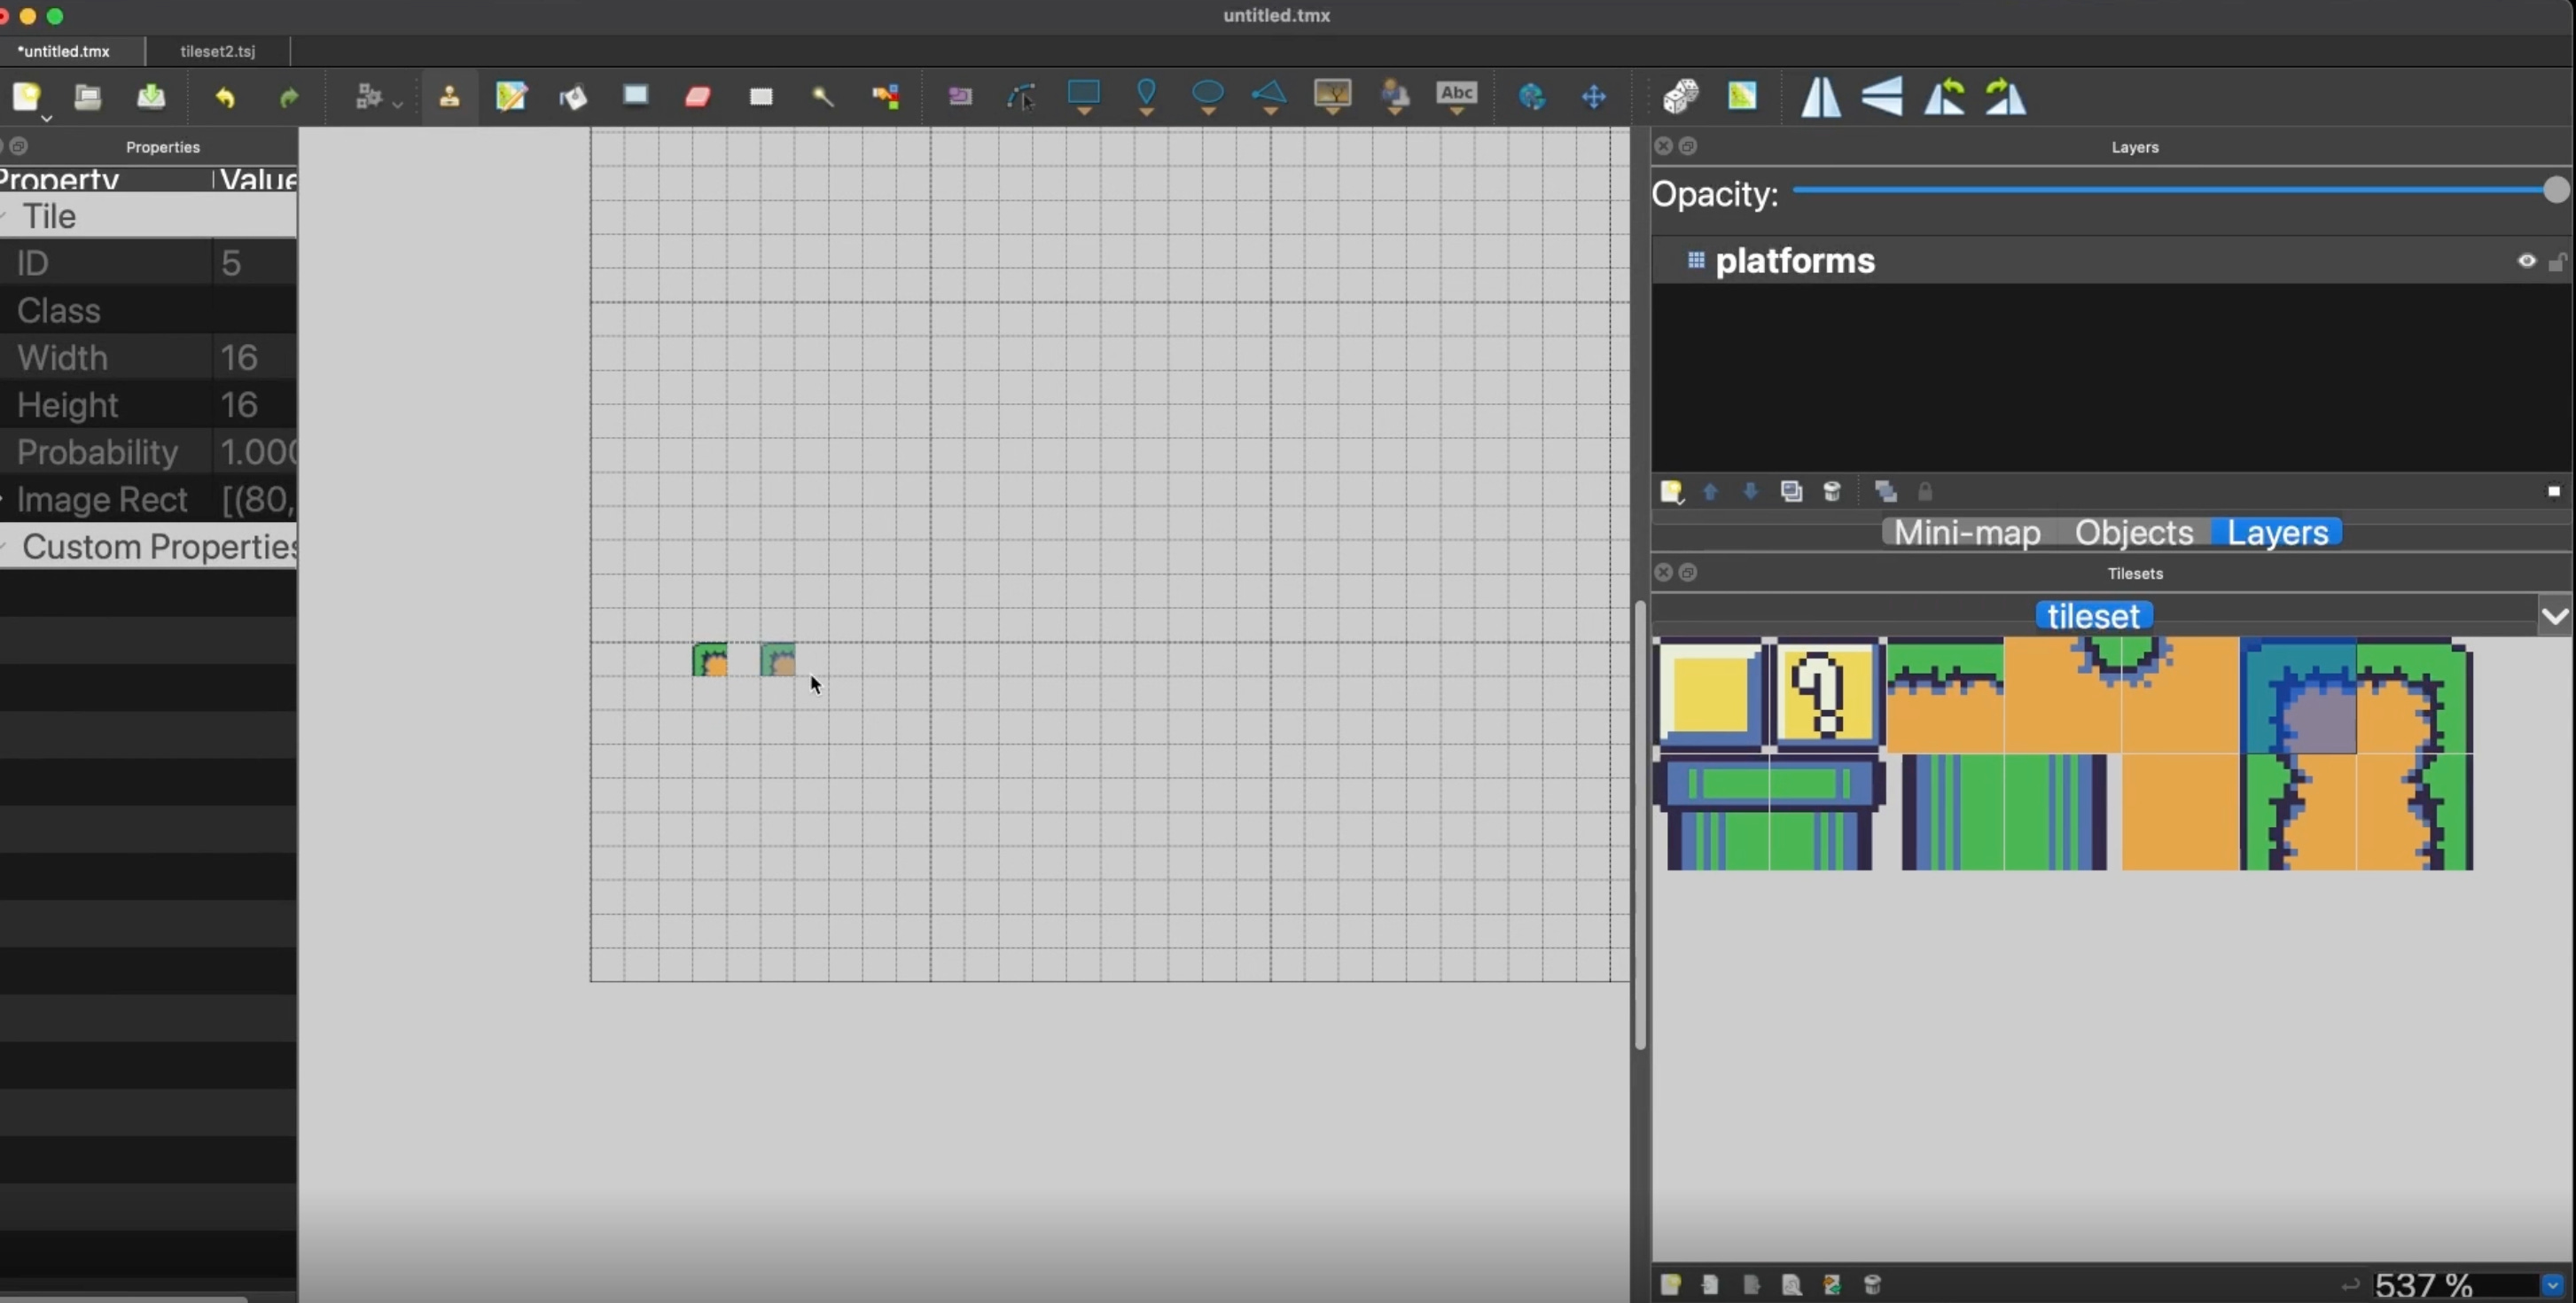
An arbitrary number of layers could then be created to appear on top of the first one allowing you to design complex looking maps.
In the inspector, you could rename layers and change their order, which would determine the order in which they would be rendered.
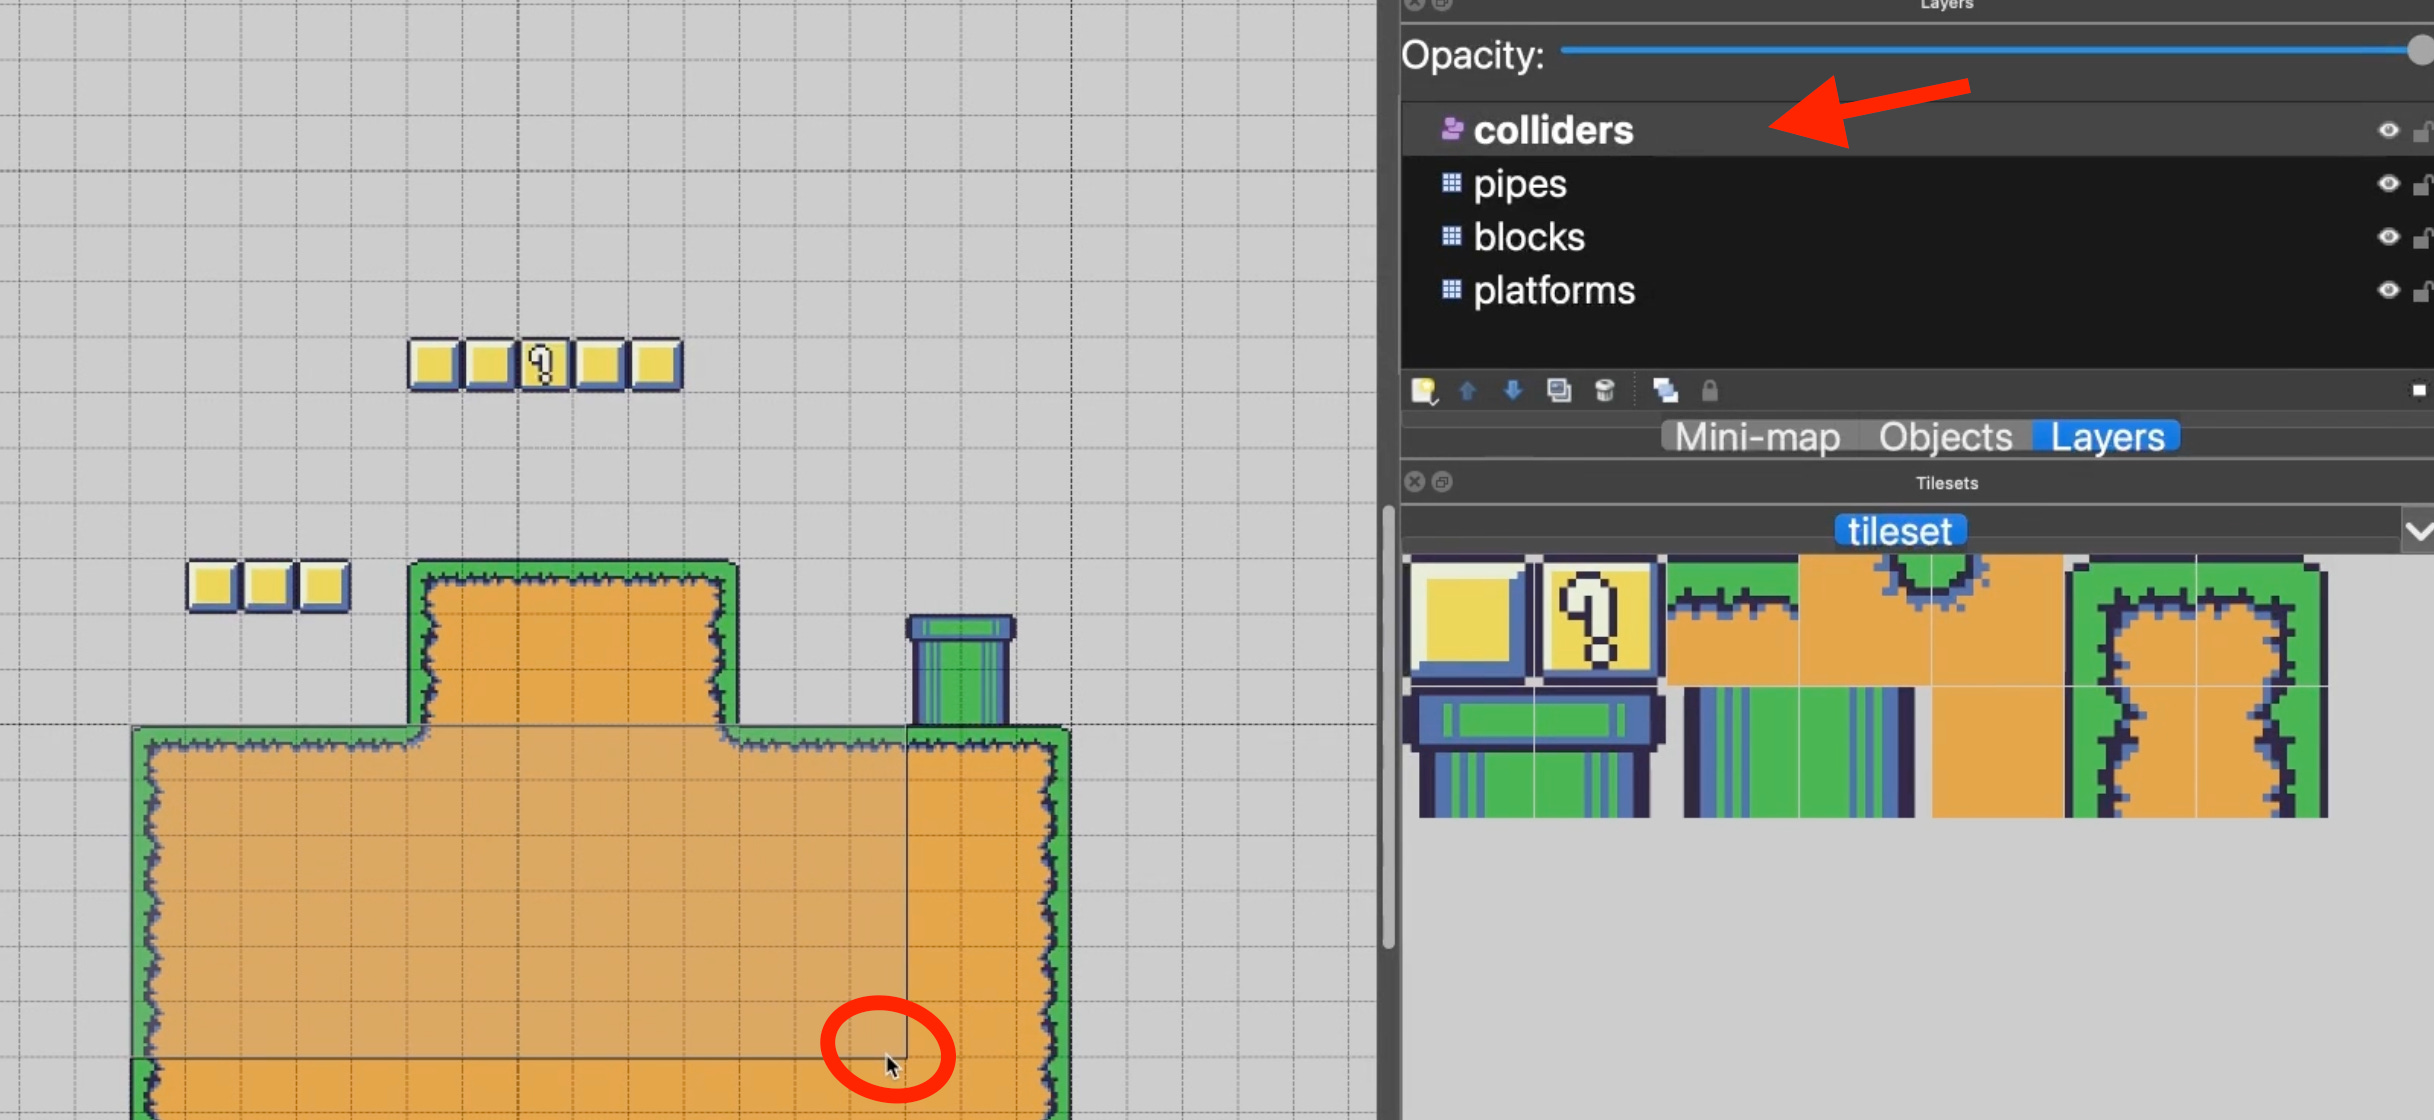
In addition to being able to create tile layers, you could create a second type of layer called an object group. This layer type could be used to place collider shapes which you could use in your code to determine which parts of the map were walls.
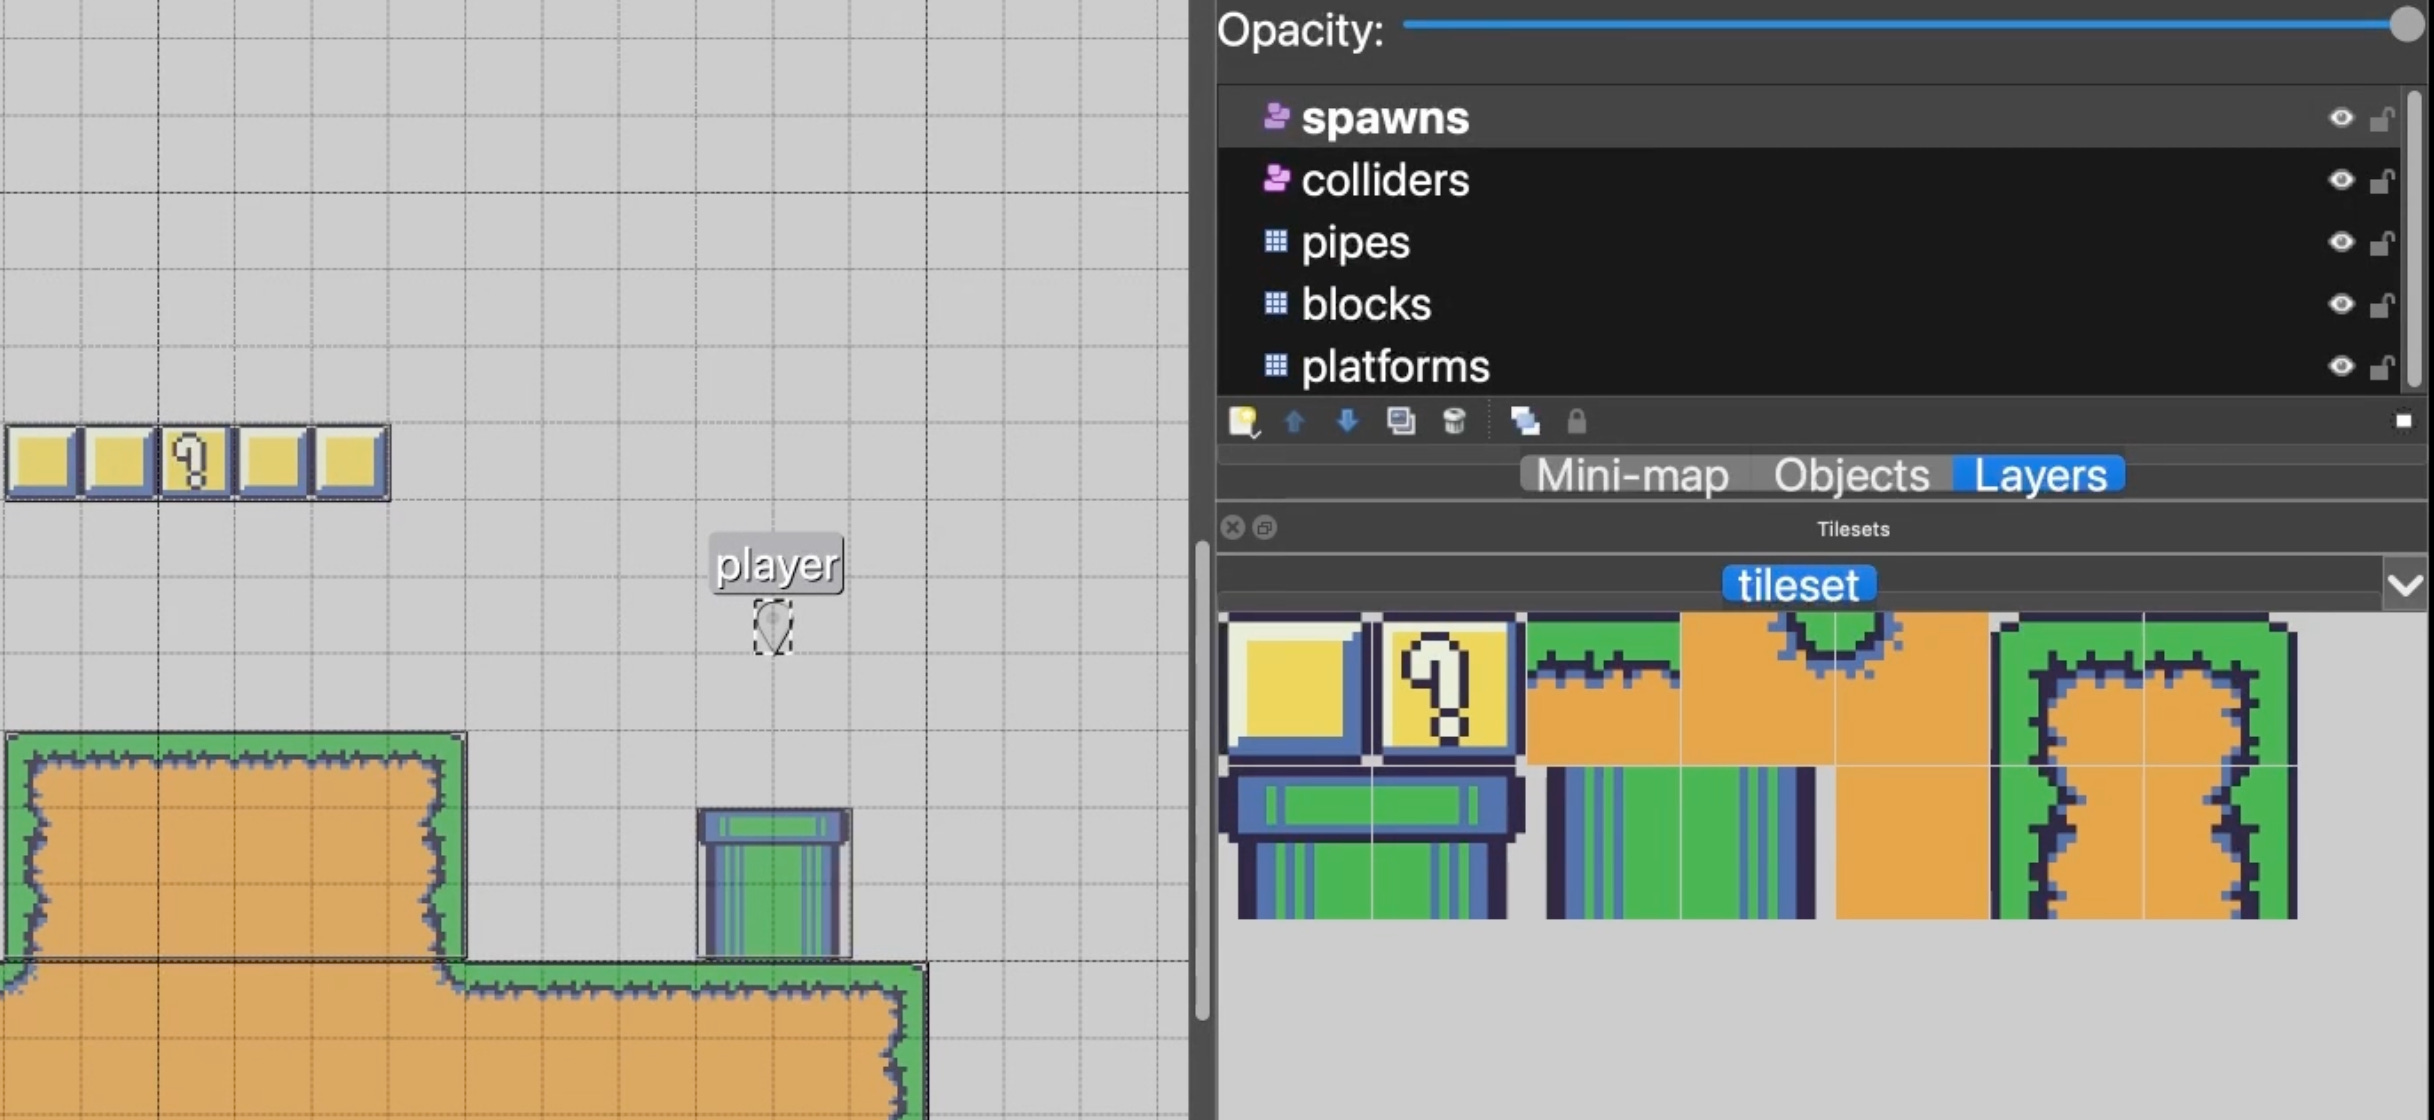
Alternatively, you could also place pins that could be used to position players, enemies and other game objects in your map.
Finally, you would be able to export your map into various formats depending on your needs.
After having learned how to use Tiled, I had finished creating a test map and was eager to test the plugin that would allow me to render it in my game. Unfortunately, I realized that the plugin didn’t work!
I concluded that the plugin expected an older deprecated version of the library explaining why it didn’t work. Kaboom.js (now KAPLAY) also didn’t have an official way of importing maps made with Tiled and still doesn’t.
I therefore felt pretty much stuck. I tried reading the code of the plugin but didn’t understand much of it.
I was about to give up feeling frustrated of not being able to achieve my goals because the people maintaining the software I was using did not take into account my use case and why would they? They maintained the library for free. They wrote the plugin for free. It was being dependent to them that felt annoying. I did not want to wait for someone else to do the work before I could continue my projects.
I also wasn’t your average software user anymore. Software is often thought as a black box. Developers know the internals and users just use the software from the outside via an interface.
However, I had a computer science degree, I knew how to code, why should I wait and not fix my pain point myself.
That’s because jumping into a new codebase as a dev is often still intimidating. You don’t have the context that led to various decisions around the code and you need to get familiar with a lot at once which always made me wary of trying to fix things myself for open source software I was using. I really needed a good reason to justify the effort.
However, this time was different, I was motivated and didn’t even need to jump into a codebase. What I needed to do was to learn how the Tiled export file worked so I could parse it in my game code and render the map.
I was initially intimidated by the various file formats you could use as exports. However, I was relieved to discover that you could export your map as a JSON file.
For those unfamiliar, JSON is a relatively simple format composed of an object with an arbitrary amount of key value pairs where keys are called properties. It’s inspired by the way objects are created in JavaScript and that’s why it’s called JavaScript Object Notation (JSON).
It’s an incredibly common format used a lot in web development. For example, it’s often used by backends and third party APIs to send data upon being requested by frontends or users of those APIs.
Knowing that we could export the map as a JSON file allowed me to answer a big question I had in mind. How to import a map made with Tiled in my codebase?
As with regular API requests, I simply needed to use the fetch() JavaScript function to fetch the file and then convert its response using the .json() method which allowed me to load the JSON into an actual JavaScript object I could use in my code.
With this out of the way, the next step was to figure out how the export file was structured so I could know how to render the map.
// map.json
{
 "compressionlevel":-1,
 "height":30,
 "infinite":false,
 "layers":[...],
 "nextlayerid":6,
 "nextobjectid":71,
 "orientation":"orthogonal",
 "renderorder":"right-down",
 "tiledversion":"1.11.0",
 "tileheight":16,
 "tilesets":[
        {
         "firstgid":1,
         "source":"tileset.tsj"
        }],
 "tilewidth":16,
 "type":"map",
 "version":"1.10",
 "width":140
}
At first the height, width, tilewidth and tileheight properties stood out. They would allow me to compute how many tiles per row and per columns needed to be rendered. In the end, however, only the width and the tilewidth properties where really needed since I would render the tiles from left to right, top to bottom. I could get by only knowing how many tiles were required per row. When I ended up rendering the expected number of tiles per row, I would move down by a tile span to start rendering the next row below.
Since the tilewidth and tileheight properties had the same values due to the tiles being squares, I only needed to use one to know where to place the next tile and by how much to move down to render the next row.
However, the most important property was the one called layers. As the name implied, its value contained an array of objects containing all the needed data for each layer.
// map.json
{
 //... omitted for clarity
 "layers":[{...}, {...}, ...],
 //... omitted for clarity
}
A tile layer was represented with an object that had the data property. Its value was an array of numbers. At first I did not understand what it meant but then it became obvious.
// map.json
{
//...
"layers":[
{
"data":[ 0, 0, 0, 0, 0, 0, 0, 0, 0, 6, 3, 3, 3, 7, 0, 0, 0, 0, 0, 0, 0, 0, 0, 0, 0, 0, 0, 0, 0, 0, 0, 0, 0, 0, 0, 0, 0, 0, 0, 13, 12, 14, 0, 0, 0, 0, 0, 6, 3, 3, 3, 7, 0, 0, 0, 0, 0, 0, 0, 0, 0, 0, 0, 0, 0, 0, 0, 0, 0, 0, 0, 0, 0, 0, 0, 0, 0, 0, 0, 0, 0, 0, 0, 0, 0, 0, 0, 0, 0, 0, 0, 0, 0, 0, 0, 0, 0, 0, 0, 0, 0, 0, 0, 0, 0, 0, 0, 0, 13, 12, 12, 12, 12, 12, 12, 12, 14, 0, 0, 0, 0, 0, 0, 0, 0, 0, 0, 0, 0, 0, 0, 0, 0, 0, 0, 0, 0, 0, 0, 0],
"type":"tilelayer",
// ... other properties omitted for clarity
},
{...},
...
],
//...
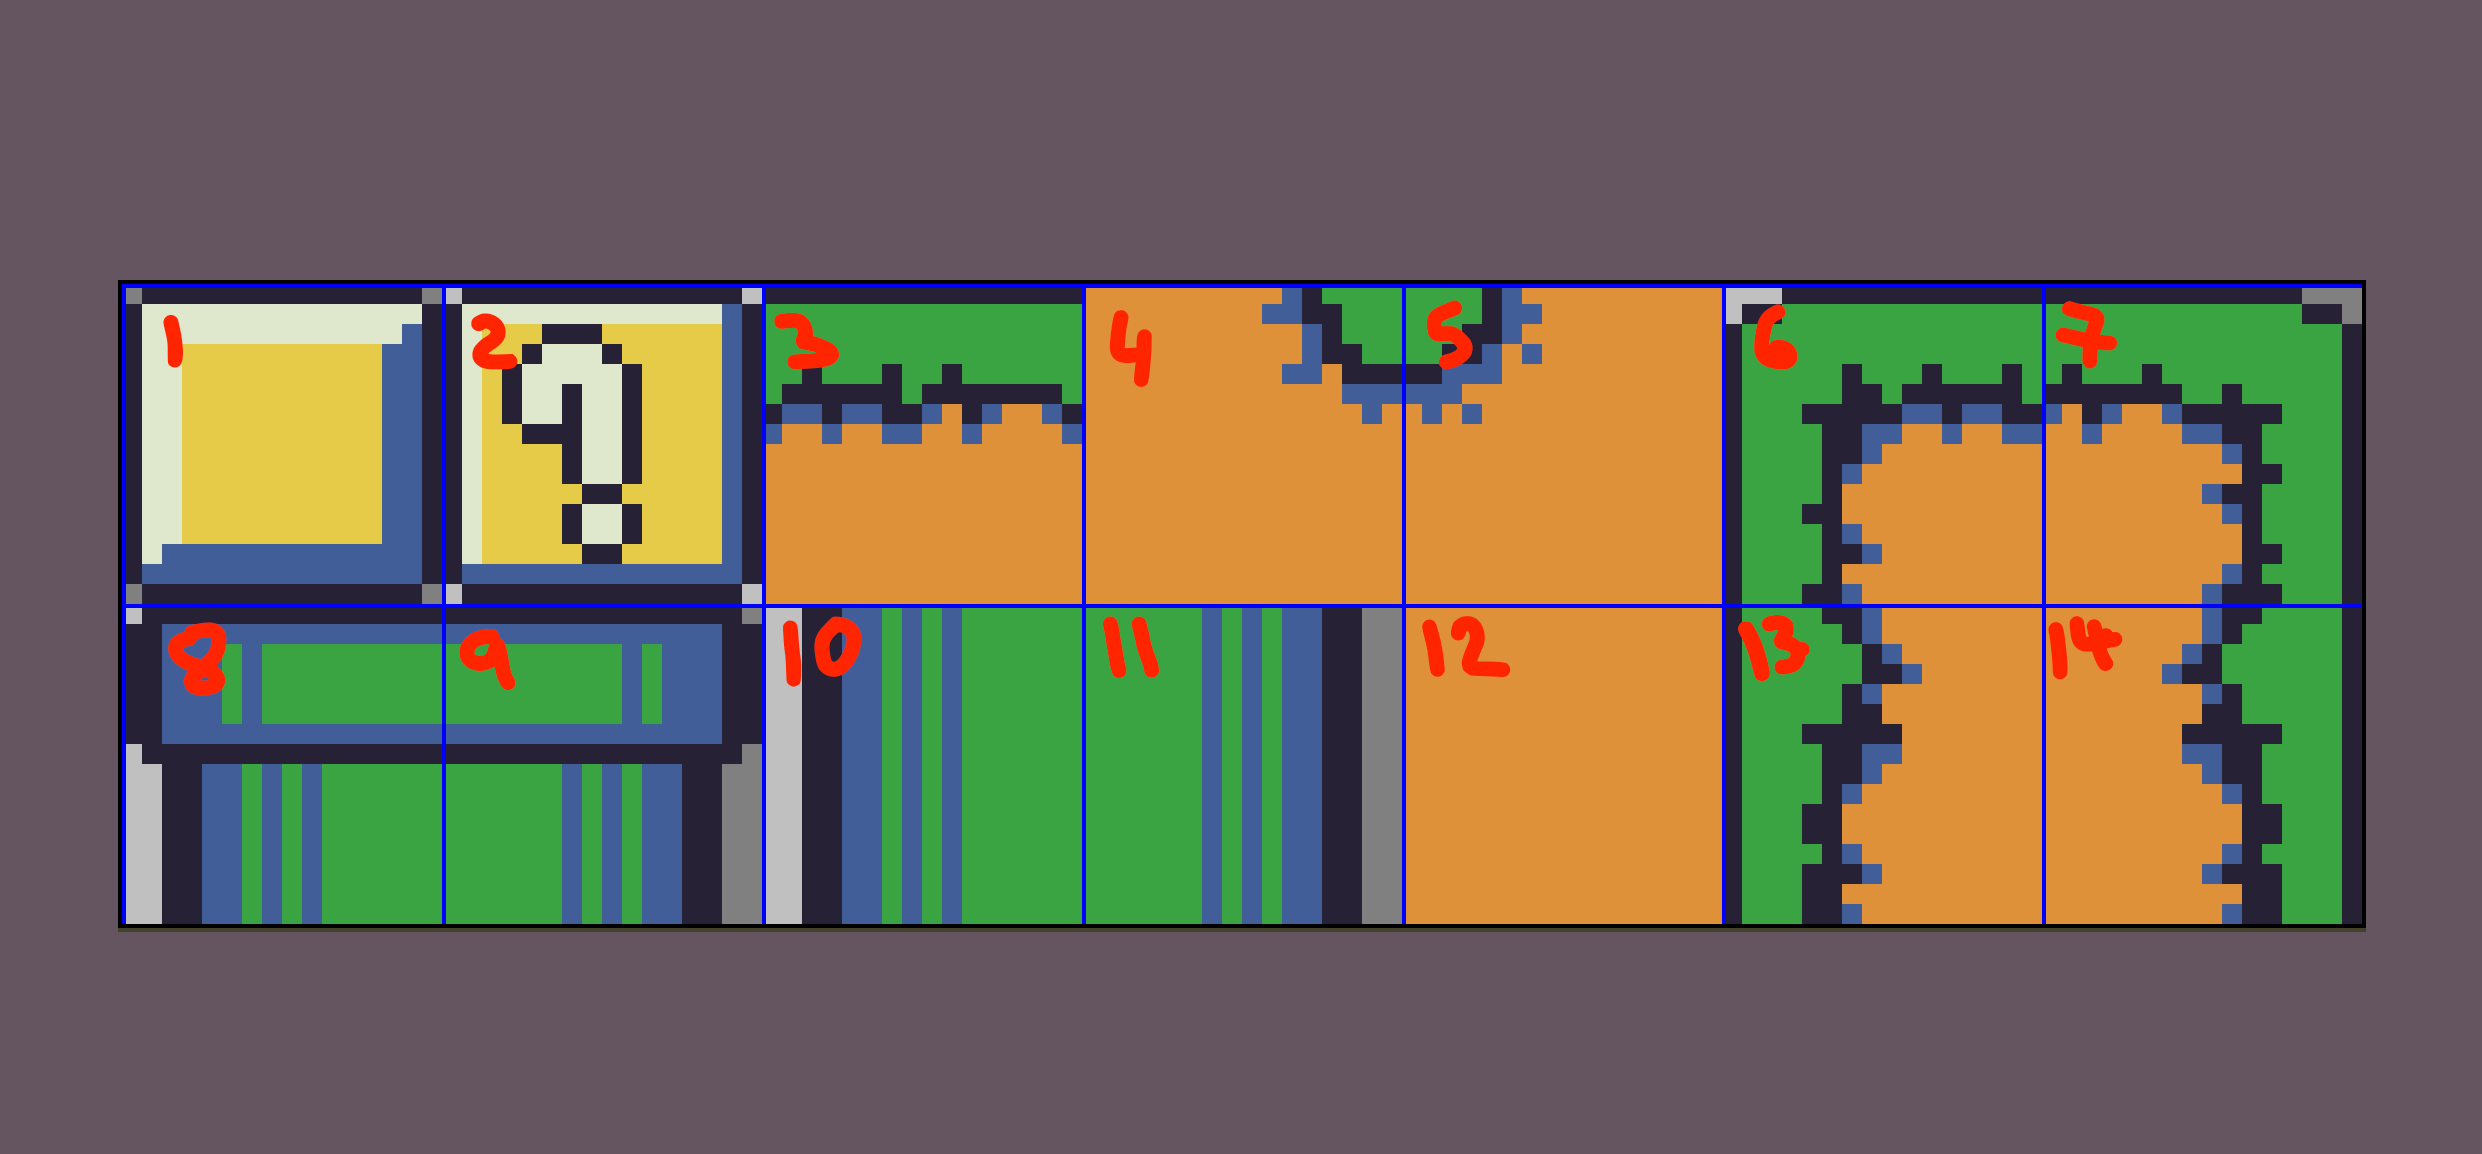
}In Tiled, each tile in the imported tileset will be assigned a number starting with 1 and then increasing from left to right, top to bottom.
The array assigned to the “data” property would contain 0 if no tile needed to be displayed therefore denoting an empty space. Otherwise, the number would determine which tile from the tileset should be rendered for a given tile in the map.
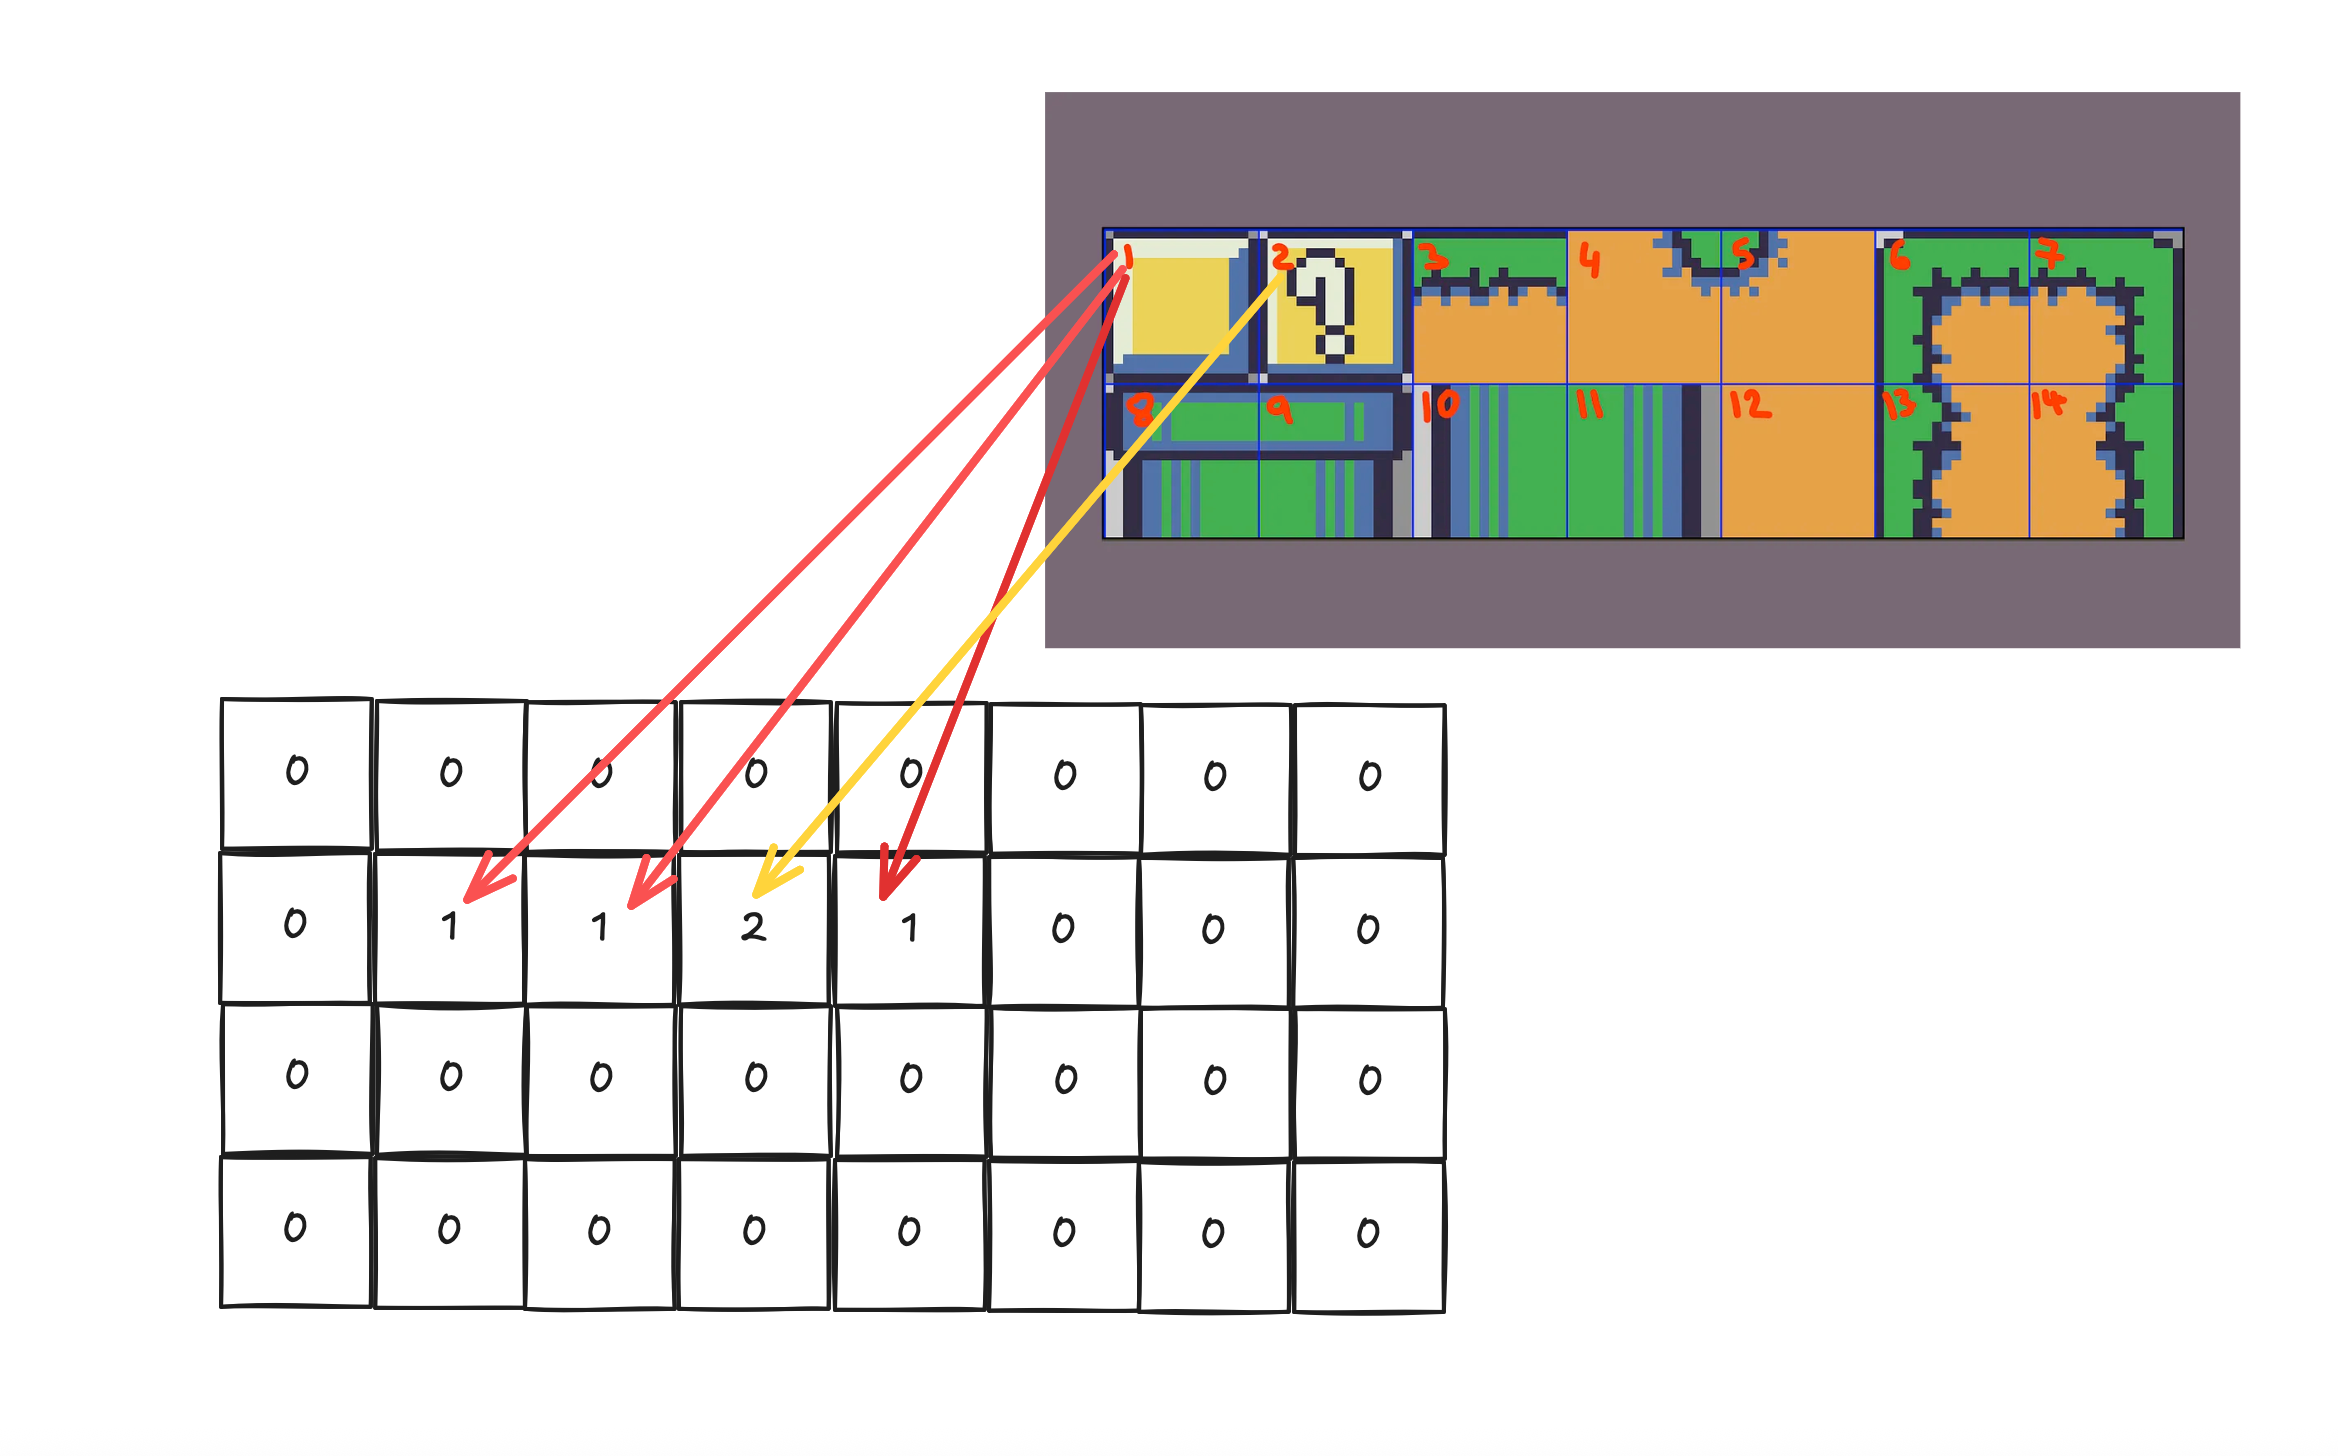
If I wanted to render a tile layer in my game, I would simply need to iterate through that array. Each iteration, I would compute the position where the tile needed to be by computing the result of the previous tile position + the tilewidth. Then, I would determine, which tile from the tileset needed to be drawn there. If the number was 0, nothing would be rendered and we would proceed to the next iteration.
While writing the rendering logic for tile layers, I experienced a problem with the way Tiled numbered tiles in the tileset compared to Kaboom.js. In Tiled, numbering starts from 1 since 0 is an empty tile. However, in Kaboom.js, numbering starts from 0.
I was able to get around this issue relatively easily by just making sure that when I needed to draw a tile, I would subtract the number in the data array by 1 to get the correct tile to display. As for when 0 occurred, as mentioned previously, I would just skip to the next element of the array after having updated the next tile position as to avoid the issue of trying to display a tile numbered 0 - 1 = -1, which wasn’t a valid index.
Finally, because I knew how many tiles were needed per row due to having access to the width and tilewidth properties, I was able to determine when to move to the next row despite the data array being one dimensional.
After having tested my code, I was able to successfully render the map onto the game’s canvas and felt overjoyed and relieved that it wasn’t as complicated as I thought it was going to be.
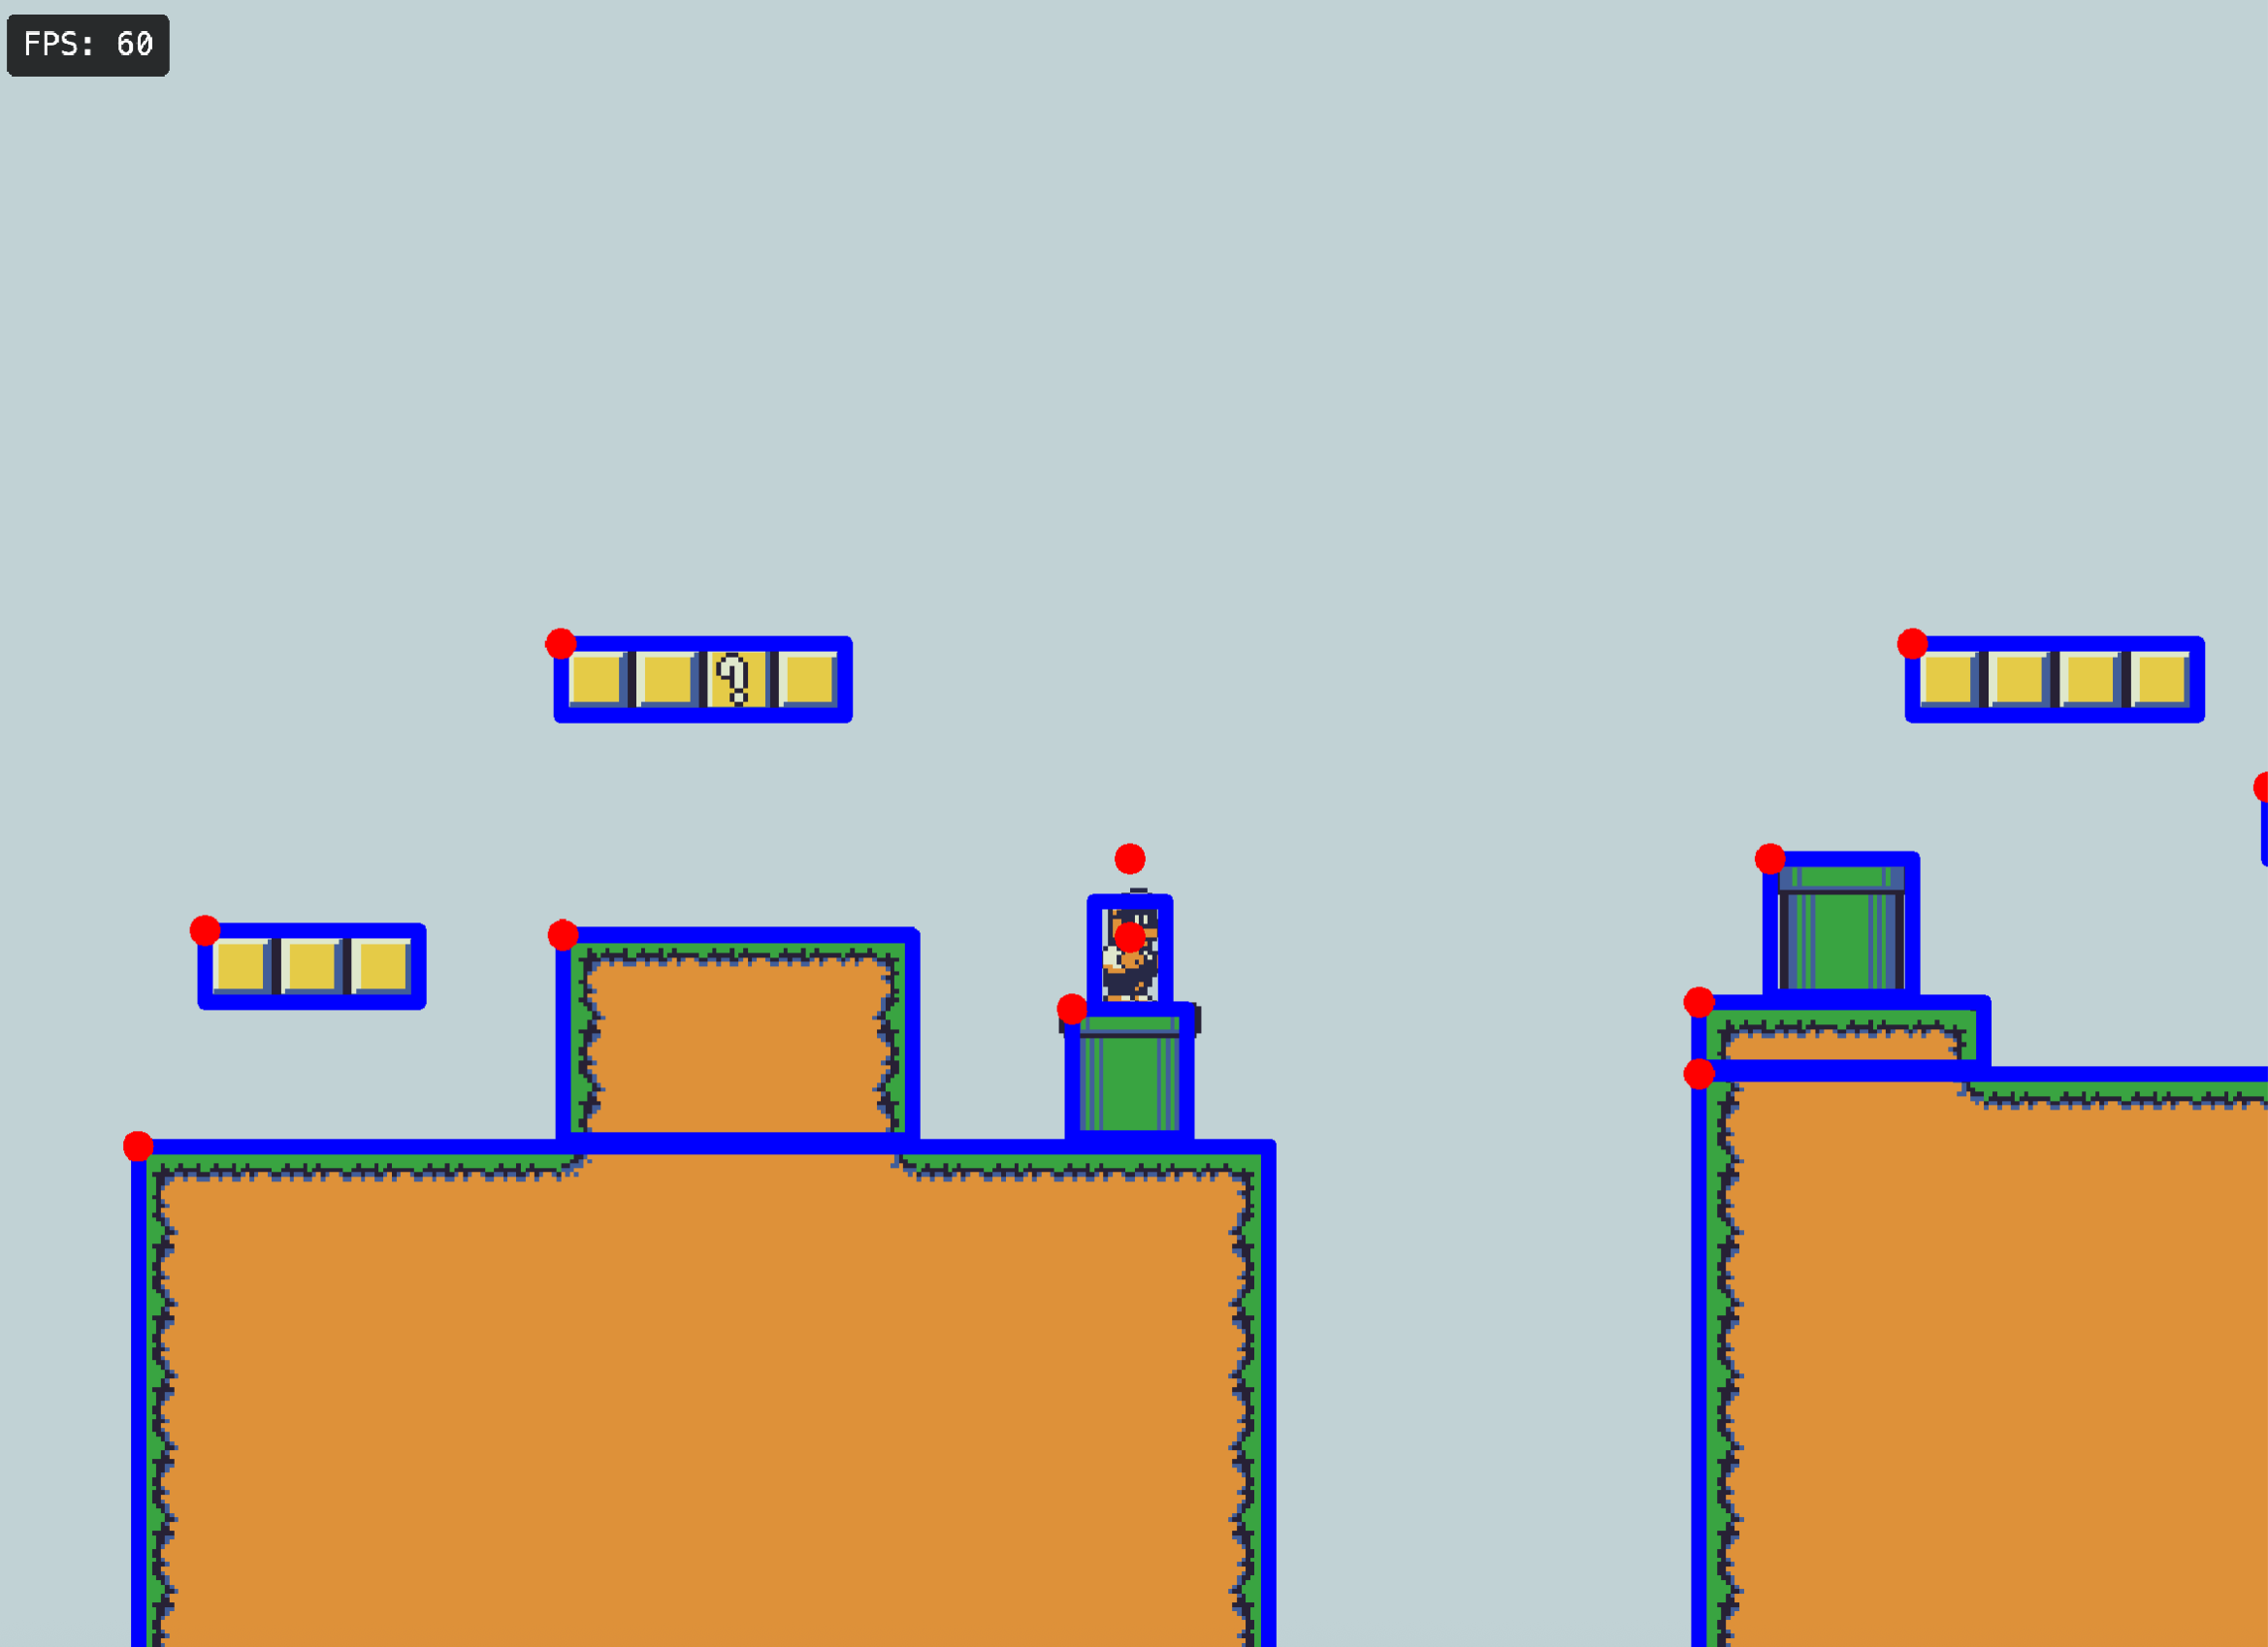
Finally, the last step was to render the object group layers which I would use to implement walls, obstacles and where to spawn game objects like enemies.
The object used to describe an object group layer in the “layers” array had a different shape than the one for tile layers.
// map.json
{
 //... omitted for clarity
 "layers":[
   {...},
   {
      "objects":[
        {
          "height":223.833333333333,
          "id":3,
          "name":"",
          "rotation":0,
          "type":"",
          "visible":true,
          "width":254.333333333333,
          "x":48.9166666666667,
          "y":256.166666666667
        },
        ...
       ],
       "type":"objectgroup",
       //... other properties omitted for clarity
      },
   },
   ...
 ],
 //... omitted for clarity
}
Rather than having a data property, we had an objects property, which instead of referencing an array of numbers, was referencing an array of objects. Each of these objects would have important properties like width, height and x, y which was all I needed to determine where to place them in my game. I would therefore, simply iterate through the objects array and create the needed game objects with the needed width and height and place them according to the x and y coordinates provided.
Since I set them up to be invisible, the player wouldn’t be able to see them, however, since Kaboom offered a debug mode, you could see their outline by pressing the f1 key.
I had finally completed the task I set out to do, and now had a more flexible way of making levels for my games. I still use this workflow to this day.
Conclusion
To conclude, game devs not using game engines, either write their own map editor or use an already existing one like Tiled to design and make their levels more efficiently.
If you’re interested in using JavaScript and the same library (now called KAPLAY) to make games, I have plenty of tutorials you can watch on my channel.
I also want to mention, that I made an exclusive step-by-step tutorial available on Patreon where I teach you how to render maps made in Tiled in your KAPLAY games in a performant and modular fashion so that you can use the same code in other KAPLAY projects.
This 40 minutes tutorial, will tackle more nuanced topics. For example, how to render polygonal colliders (useful for slopes) which differ from regular rectangular colliders. In addition, I have also bundled my paid mario-like asset pack as part of this tutorial.
You can access the tutorial here.
If you liked this post and want to see more of it, I recommend subscribing as to not miss out on future posts.
In the meantime, you can read this next.
The Struggle of Wrapping a JavaScript Game for Desktop

The story begins after I’d spent some time making web games in JavaScript. At the time, I was looking at the various monetization options that were available.
Great article, I made Sprite Fusion exactly for making web-based level design ! I added native engines export later, but still JSON export is the first-class supported one :) https://www.spritefusion.com/