
What I Learned Making a Duck Hunt Clone in JavaScript


I released a small web game which is a clone of the classic game Duck Hunt. (You can play it here.) Now that the game has been released for a while, I think it’s the perfect moment to reflect on what I learned building this project.
Before we start, let me present the game. As with the original Duck Hunt, the goal is to shoot as many ducks as possible using a cursor. In my game, it’s done with the mouse. In the original, it was done with a gun-like accessory, the NES zapper.
Every hunt, a duck will start flying and you have 3 bullets and a limited time window to shoot it. There are 10 hunts per round. If you fail to successfully shoot a duck in a hunt, the dog will laugh at you.
Once a round ends, another round starts only if more than 5 ducks were successfully shot in the previous round. Otherwise, it’s game over.
Once a new round starts, the duck speed will increase compared to the previous round as to increase the game’s challenge.
That’s the gist of it.
I made this game using JavaScript and the KAPLAY game library. In case, you’re unfamiliar, KAPLAY is a very simple and easy to use JavaScript and TypeScript library with many built-in features which enables developers to make 2D games quickly.
I really recommend giving it a try.
What I learned in terms of Game Design
The main game design lesson I learned is that your game should always be built upon a few simple mechanics until you obtain a solid foundation. By solid foundation, I mean that the game is fun to play at that stage. To elaborate, there is this sentiment that you need a lot of complex systems, mechanics and content to make a good game. However, by remaking a game like Duck Hunt, I realized that a game can get away with simple mechanics and still remain fun. However, more complex mechanics/features/content makes a fun game fun for longer.
That’s why after making this project I believe that development should always start with building a game that’s simple and fun. Only when this is done, then you can focus on adding more mechanics/systems and content to make the game remain fun for longer.
This is echoed by one of the comments I received when I published the game which suggests developing things further.

What I learned in Terms of Art
Despite making a clone, I wanted to make my own art for the game. I took heavy inspiration and sometimes just recolored the sprites from the original Duck Hunt but chose a different color palette.
The main lesson I learned while making sprites for the game is that sticking to a limited color palette is key to having a good end result. However, you shouldn’t be afraid of expanding the color palette if you absolutely need it.
In fact, it’s much easier to expand a given color palette one color at a time then to not limit yourself to a palette first and choose colors on the fly. When you need a new color, you can more easily compare your new color choice with the existing palette and see if it fits and change your choice if not.
When it comes to picking a color palette, I found the website Lospec to be very useful. You should check it out.

What I learned in Terms of Programming
This project also gave me the opportunity to reflect on my tech stack choices. As I mentioned earlier, I used JavaScript alongside a library called KAPLAY.
Why JavaScript + KAPLAY?
If you’re new to my content, you might be wondering why I use a programming language that isn’t used much in game development.
My background is in web developement, precisely full stack web development. I originally wanted to start game development just as a side hobby. I couldn’t justify the time investment in learning a game engine or different programming languages to try something I wasn’t even sure to really like.
That’s why I decided to dive into game dev using tools I already knew. Now, with more experience, I still use the same technologies/programming languages because the combination of JavaScript + KAPLAY really does allow me to move quickly.
KAPLAY despite being a library, has enough built-in features that you don’t really spend time reinventing the wheel. Collisions, Input handling, Physics, etc… are all included.
The only thing not included, that I consider essential for bigger games is an editor for placing things around for your levels. However, I was able to mitigate this drawback rather easily by using an external program called Tiled.
Another strong point of this stack, is the how easy and responsive the development environment is. You simply have a browser window with your game running in it. When you make changes, the project instantly reloads which allows you to see changes immediately.
Why Not TypeScript?
If you’re somewhat familiar with web development, you might also wonder why I didn’t use TypeScript?
Recently TypeScript has been establishing its way as the best option for web development due to the added safety and readability in big codebases compared to JavaScript.
As someone who used TypeScript professionally, I do agree that TypeScript overall is good.
The only reason I did not use it for this project and for most of my previous projects is because I originally made these games to make game development tutorials on YouTube.
After having made a few TypeScript game dev tutorials, I quickly realized on YouTube, using TypeScript will result in considerably less views compared to JavaScript.
Now that I have changed the way I do YouTube, I no longer feel compelled to use JavaScript exclusively and will probably use TypeScript for my next few projects and then compare my experience.
How Useful Finite State Machines Are in Game Dev
While building this game, I realized how useful finite state machines are in game development. I have found myself using them to handle animations, build enemy AIs, implement cutscene logic and handle general game state.
For those unfamiliar, a finite state machine is a way to model a program where you define a set number of states and for each of them define the logic that runs when entering, when exiting, or while remaining in that state.
They make certain aspects of game logic easy to organize and maintain. To make things less abstract, let’s look at how I used state machines in my Duck Hunt clone.
How The Intro Cutscene is Implemented Using State Machines
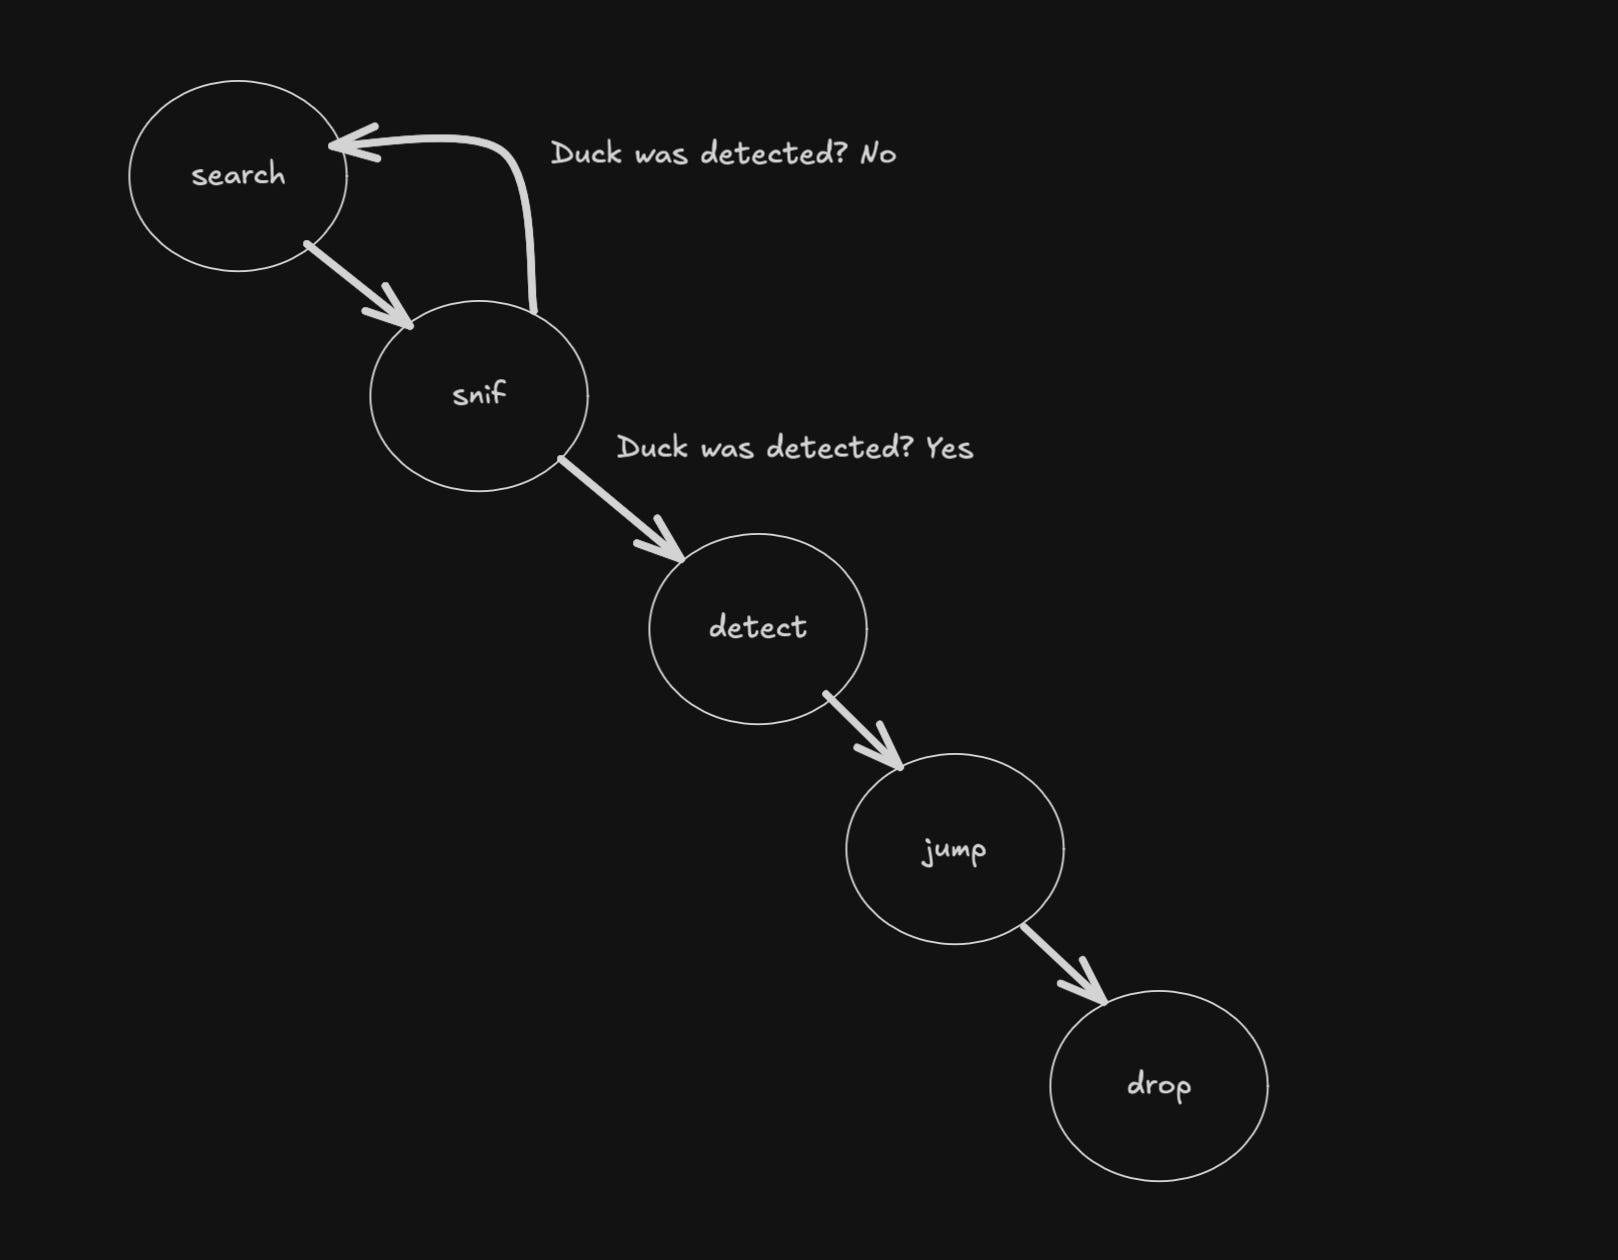
Before the game starts, we can see a short cutscene where the dog is moving forward and sniffing around to find ducks. Once a duck is detected, the dog jumps into the grass and the game starts.
To make this cutscene, I needed to move the dog and play the relevant animations in a deterministic fashion. I also needed a way to determine when it was appropriate to run this cutscene. This led me to create a state machine for handling all of the game’s state. The diagram below shows how it is structured.

When using KAPLAY, you can create a state machine using the following syntax :
const stateMachine = k.add([
      // first param : default scene name
      // second param : array of all possible states
      k.state("menu", [
        "menu",
        "cutscene",
        "round-start",
        "round-end",
        "hunt-start",
        "hunt-end",
        "duck-hunted",
        "duck-escaped",
      ]),
]);
I am aware that not everyone reading this is familiar with KAPLAY’s API, so to put it briefly, we define all the states we want to use for our state machine by passing an array of strings containing the names of each one.
Once the state machine is created, KAPLAY grants you methods where you can define what should run in each state. Here are a few examples :
stateMachine.onStateEnter("menu", async () => {
   // define your logic here that will run when the state machine enters
   // the "menu" state

   // KAPLAY function that allows you to set a timer (1 sec in this example) before
   // executing what comes next
   await k.wait(1);

   // method to enter another state
   stateMachine.enterState("cutscene");
});

stateMachine.onStateUpdate("menu", () => {
   // define your logic here that will run every frame
   // while the state machine is still in the "menu" state
});
Writing your logic within those methods, allows you to have a very easy to understand codebase. This makes implementing complex game state easier. I also used a state machine for the dog’s movement and animations, using each state to determine how to move the dog, which sounds to play and/or what animations to play.
Conclusion
I think I covered all the main lessons I learned while making this project. Reading this post, you might have been inspired to make your own games in JavaScript/TypeScript using the KAPLAY library. Down below, you’ll find resources to help you with this. Hope it helps!
Learn The Basics of JavaScript and KAPLAY to Make Games Quickly

On my Substack, I usually publish tutorials teaching how to implement game mechanics in JavaScript using a library called KAPLAY.
How to use KAPLAY without dealing with Node.js, Bundlers and NPM

KAPLAY is a JavaScript library for making games. It’s aimed to be simple to use. However, installing it like any modern JS library can become tricky for beginners and it doesn’t have to be.
How Animations Work in KAPLAY

This posts assumes basic knowledge of the KAPLAY library, a library for making games in JavaScript. If you want to learn it, check out my YouTube channel for project based tutorials here and/or check out the library’s docs here.
Interesting article! I will have to look into state machines a bit more in Kaplay. At this point in my game development journey (very early) I am drawn to frameworks/libraries like Kaplay/Phaser/Pixi more than game engines. Time will tell. Thank you for the article.👍✌️
Love the way how intuitive it looks when defined.
But...
k.state("menu", [
"menu",
Why do you have two menus declared?