
How to Deploy a Vite JS Game Project on GitHub Pages


In my tutorials on YouTube, I often use a tool called Vite. Vite is a tool that builds Node.js projects so that they run in the browser. The reason someone would use a tool like Vite is that by default you cannot run projects that use NPM libraries (ex: React.js, KAPLAY, etc…) as is. You need to first bundle your code in JS that can run in the browser. Vite takes care of that.
If you want to put your game project on itch.io (a site to host games for free), the deployment process is simple. You simply run the command “npm run build” and zip the created dist folder.
For hosting on GitHub pages, it’s slightly more complex. Here is a step by step guide on how to deploy your project there.
Preparing The Project
Step 1
Make sure that your project’s repo is on GitHub.
Note : Deployment won’t work if you create a brand new project and do not run “npm install” at least once before putting it on GitHub.
Step 2
Create a vite.config.js file with the following content :
import { defineConfig } from "vite";
import react from "@vitejs/plugin-react"; // remove if you're not using react

// https://vitejs.dev/config/
export default defineConfig({
  base: "/<name-of-your-repo-on-github>",
  plugins: [react()], // remove if you're not using react
});
Make sure to put in the base, the exact name of the repo on GitHub otherwise deployment won’t work.
If you’re importing local fonts with CSS, make sure that your paths for the fonts are relative. For example :
@font-face {
  font-family: "ibm-bold";
  src: url(/fonts/IBMPlexSans-Bold.ttf);
}
Here my font is located in public > fonts > IBMPlexSans-Bold.ttf.
Deploying on GitHub
Step 1
Head over to your repo’s GitHub page. Go to the “Settings” tab and then the “Pages tab” within.

Step 2
Once on the “Pages” tab, click on the “Source” dropdown under the “Build and deployment” section and select the “GitHub Actions” option.

Step 3
Once the “GitHub Actions” option is selected, click on the “create your own” near the text saying “Use a suggested workflow” located below the “Source” dropdown. You’ll be sent to a page where you need to create a new file.

Step 4
Name the file “main.yml”, the name is not important but it must end with a “.yml” extension. Remove the content of the file that’s already there and replace it with the script below.
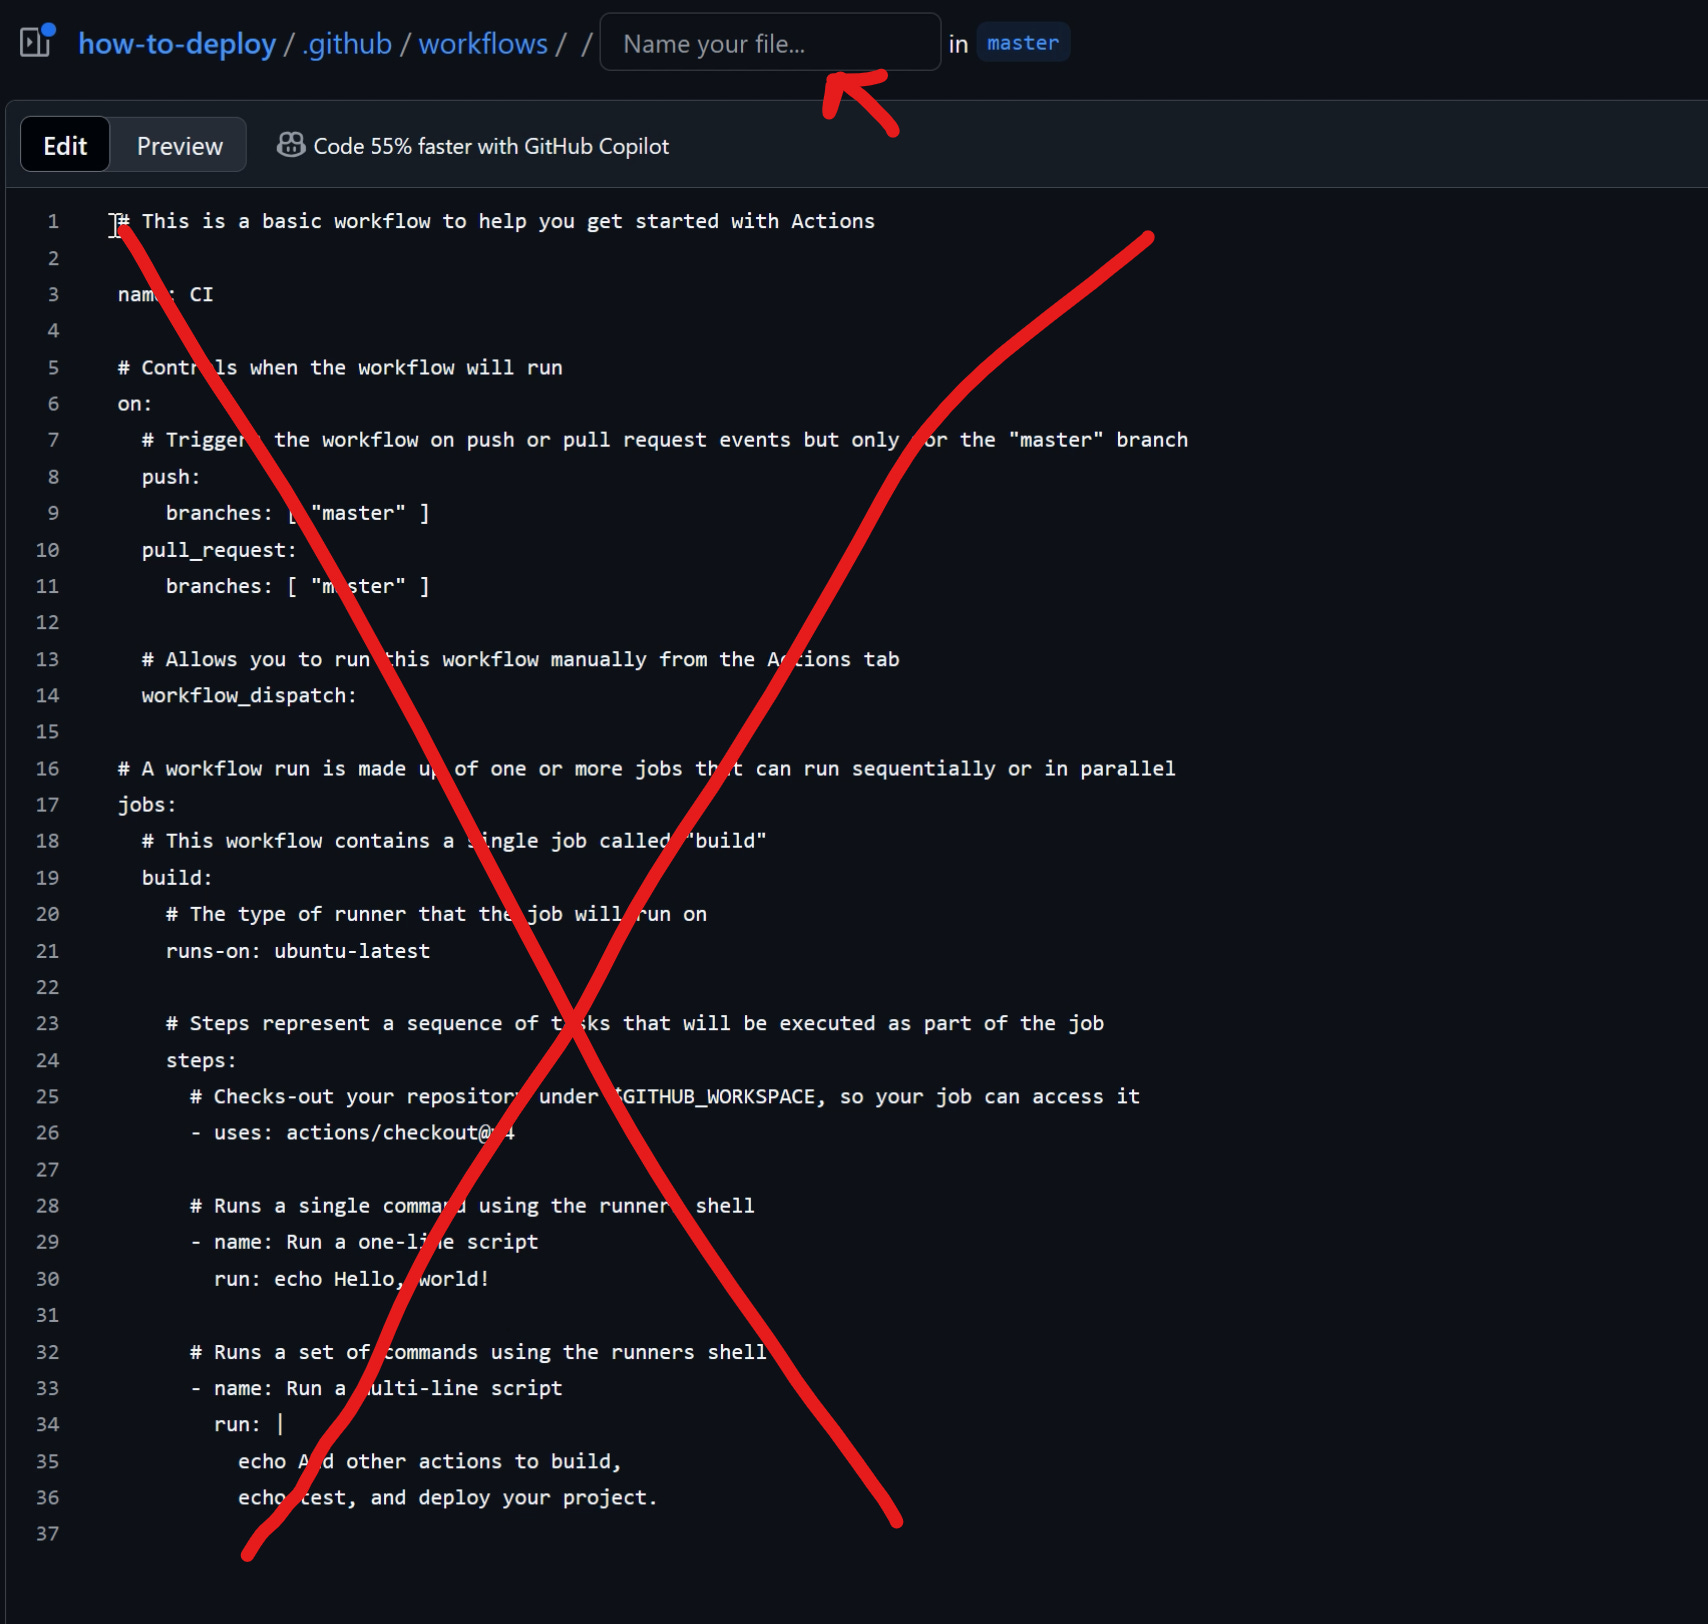
The script comes from the Vite docs. You can find it here or copy and paste the following :
# Simple workflow for deploying static content to GitHub Pages
name: Deploy static content to Pages

on:
  # Runs on pushes targeting the default branch
  push:
    branches: ['main']

  # Allows you to run this workflow manually from the Actions tab
  workflow_dispatch:

# Sets the GITHUB_TOKEN permissions to allow deployment to GitHub Pages
permissions:
  contents: read
  pages: write
  id-token: write

# Allow one concurrent deployment
concurrency:
  group: 'pages'
  cancel-in-progress: true

jobs:
  # Single deploy job since we're just deploying
  deploy:
    environment:
      name: github-pages
      url: ${{ steps.deployment.outputs.page_url }}
    runs-on: ubuntu-latest
    steps:
      - name: Checkout
        uses: actions/checkout@v4
      - name: Set up Node
        uses: actions/setup-node@v4
        with:
          node-version: 20
          cache: 'npm'
      - name: Install dependencies
        run: npm ci
      - name: Build
        run: npm run build
      - name: Setup Pages
        uses: actions/configure-pages@v4
      - name: Upload artifact
        uses: actions/upload-pages-artifact@v3
        with:
          # Upload dist folder
          path: './dist'
      - name: Deploy to GitHub Pages
        id: deployment
        uses: actions/deploy-pages@v4
Once done, you should commit your changes.

Step 5
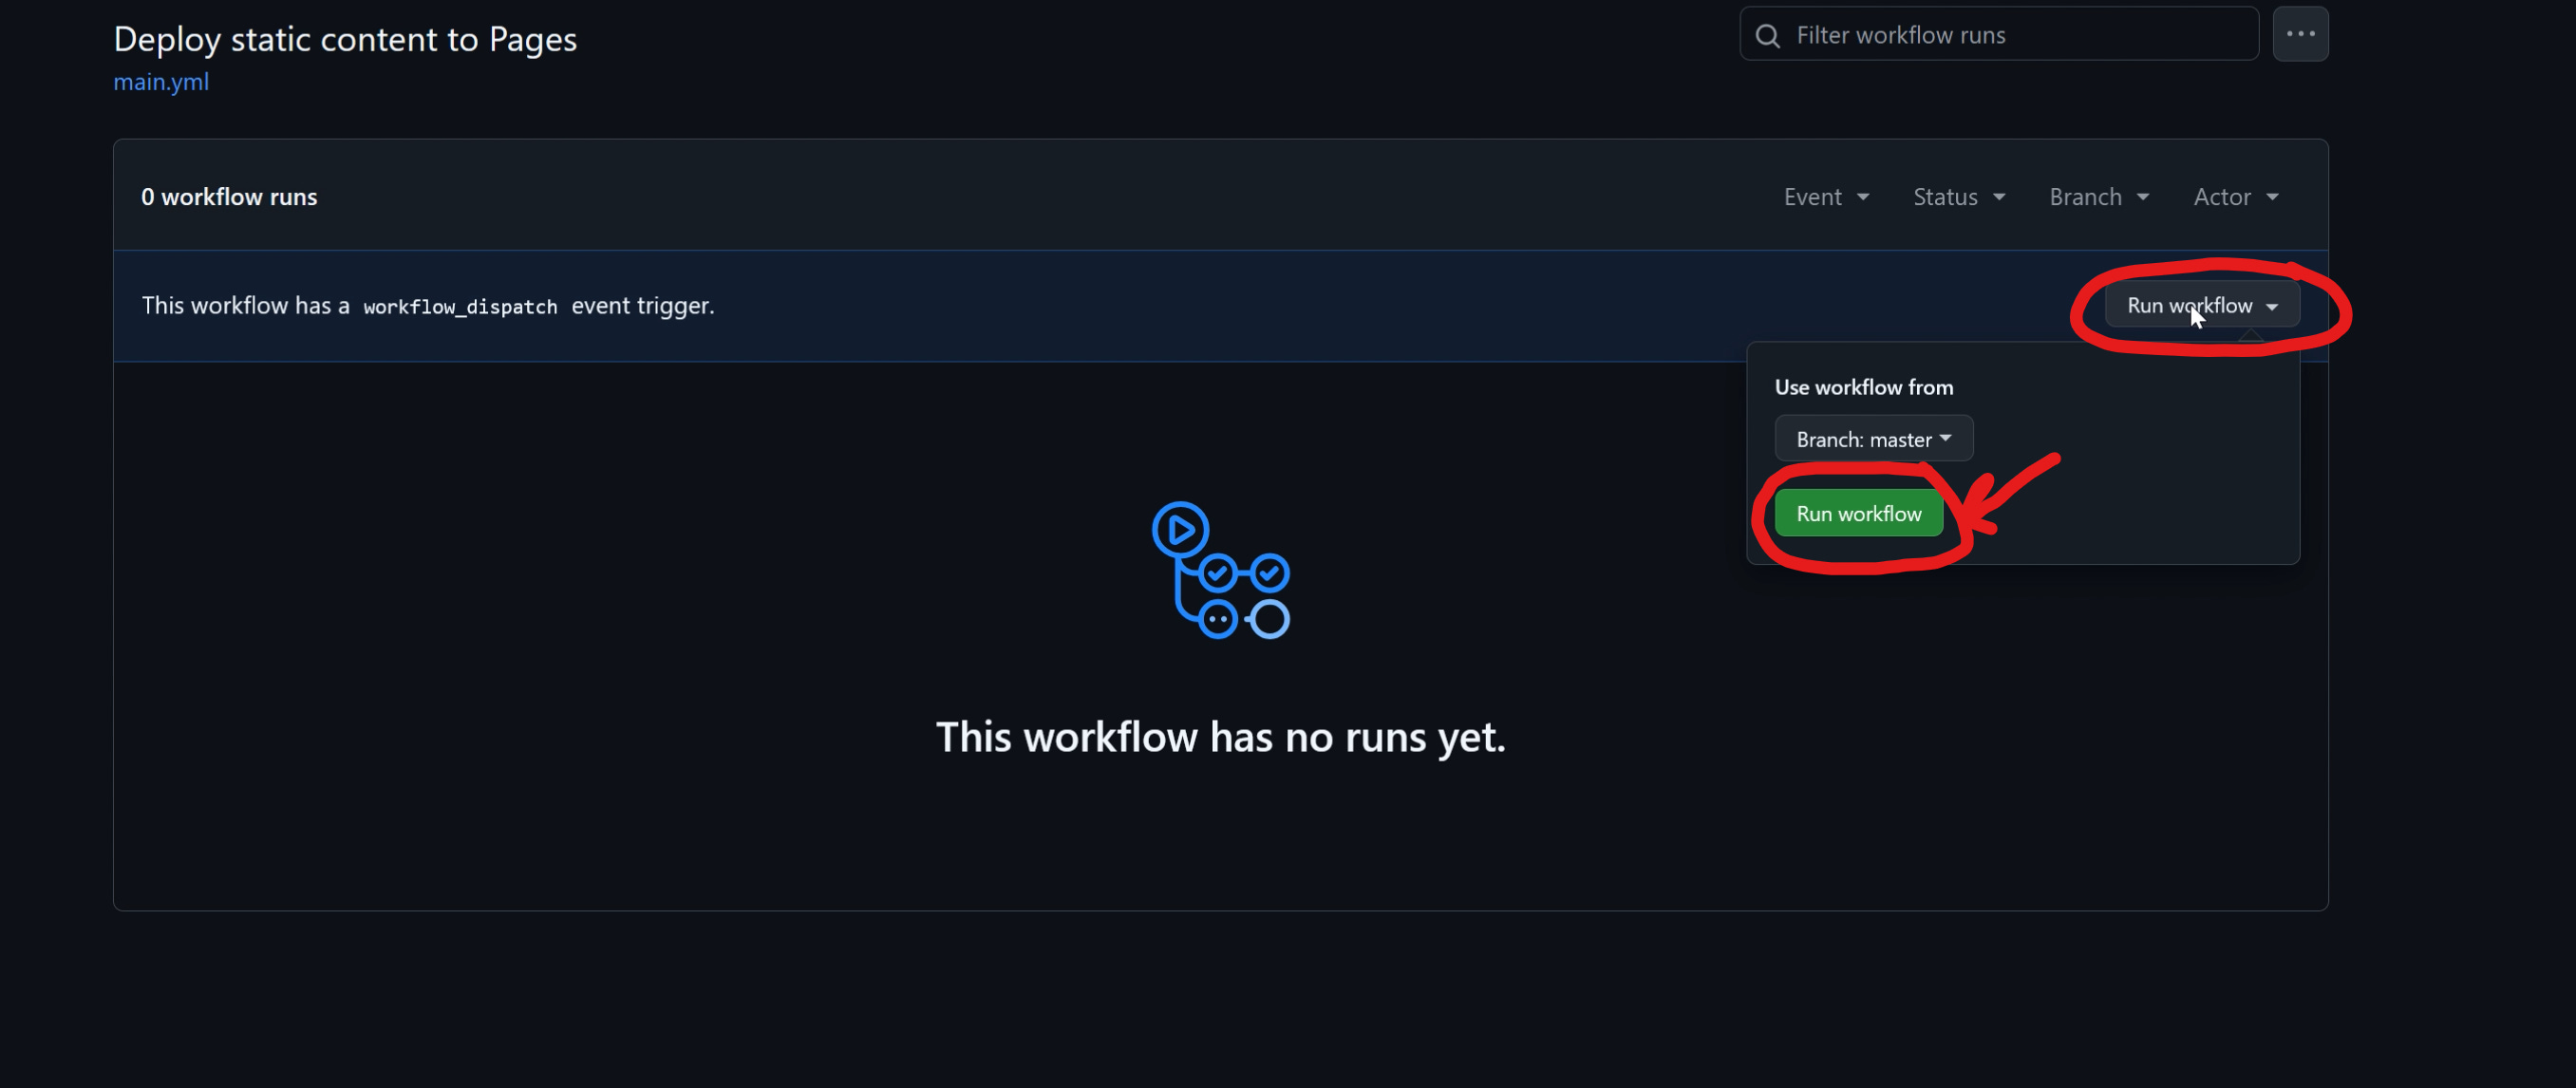
Now you can go to the “Actions” tab of your repo’s GitHub page and click on the option on the sidebar named “Deploy static content to Pages”.

You’ll see a new option appear in the “workflow runs” section of the page. Click on the “Run workflow” dropdown and then click on the “Run workflow” button.
Your workflow will now run and you can click on “Deploy static content to Pages” to see its progress.

Once the workflow is successful you’ll be able to click on the link where the project is hosted.

Hope you enjoyed this tutorial! Consider subscribing for more written content like this.
In the meantime, you can read previous tutorials I made.
How to Implement Infinite Parallax Scrolling Backgrounds in JavaScript

Infinite parallax scrolling backgrounds are nice to look at because they add depth to a 2D scene. In this tutorial, I’ll teach you how to implement them in JavaScript with the Kaplay library.
How to Fix Diagonal Movement in 2D Top-Down Games

When making a top-down 2D game, you might be tempted to implement 8 directional movement in a naive way resulting in the player moving faster diagonally.